AGILITY OPTIONS-PICK PACK
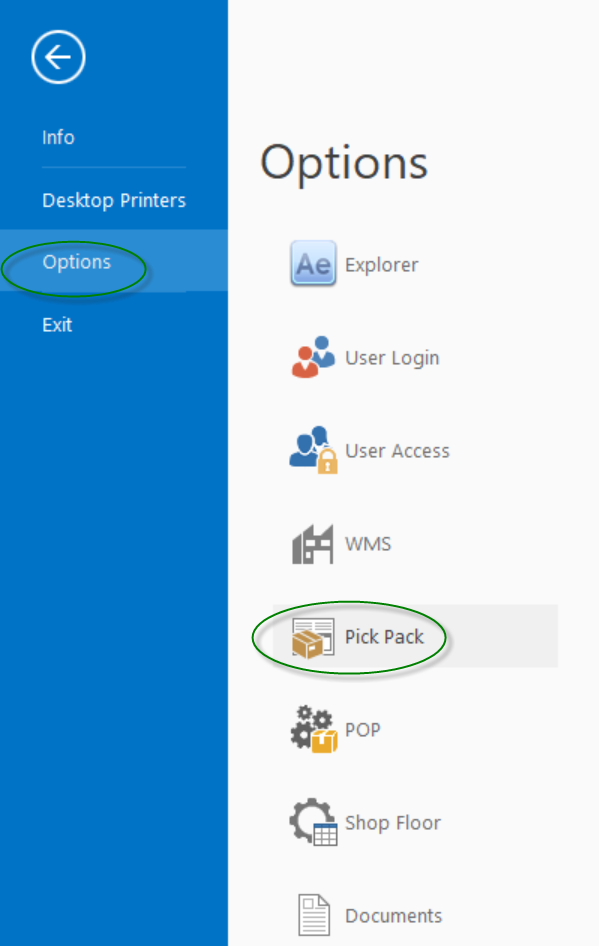
To begin setting up your Pick Pack options in Agility, select File then Options then Pick Pack.
Figure 1: Locating Pick Pack Options
General
Figure 2: Pick Pack Options-General
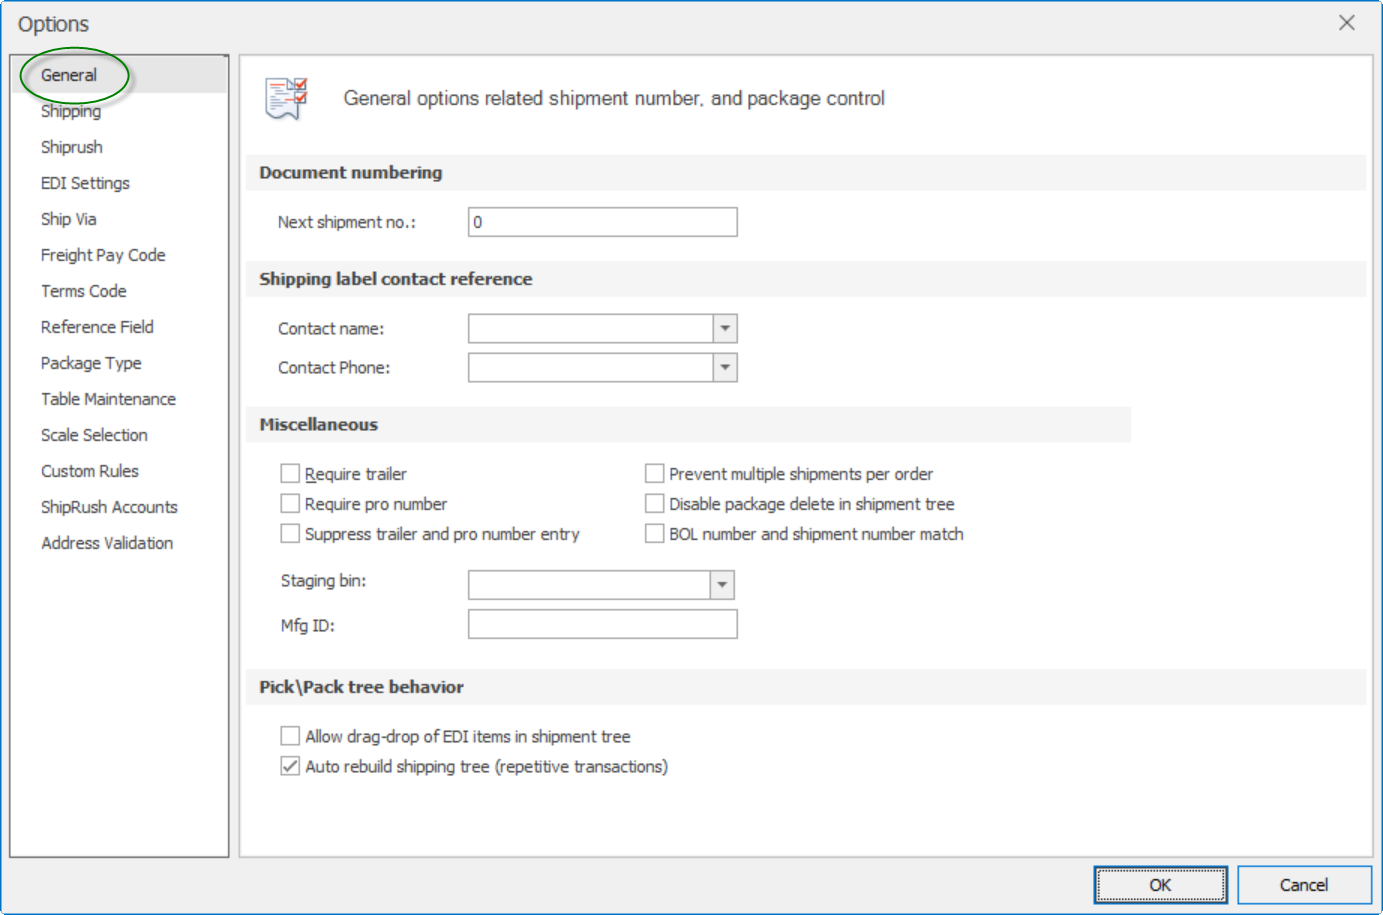
Document numbering
Next Shipment no.: Enter the shipment number that you want to begin using. The shipment numbers will increase sequentially from this number. IF EDI integration is turned on, this number is automatically based on the next shipment number from the ASN table in the EDI database.
Shipping label contact reference
Contact name: Use the drop down box to select from which field to pull the contact name. You may also select "none".
Contact phone: Use the drop down box to select from which field to pull the contact phone. You may also select "none".
Miscellaneous
Require trailer: Checking this box will require the user to enter a trailer number at the time of shipment.
Require pro number: Checking this box will require the user to enter a pro number at the time of shipment.
Suppress trailer and pro number entry: Checking this box will remove the requirement for a trailer and pro number entry at the time of shipment.
Prevent multiple shipments per order: Checking this box prevents the same order from appearing on more than one shipment. Checking this box will prevent you from processing backorders. All items must be shipped on one order. BO Items will not be allowed to be shipped on another shipment.
Disable package delete in shipment tree: Checking this box will block the user from deleting a package which appears in the shipment tree.
BOL number and shipment number match: Checking this box will set the BOL number equal to the shipment number on every shipment.
Staging bin: Select a staging bin from the drop down menu. The bin selected will require sufficient inventory to be staged and available in the bin for each item at the time of shipment.
Mfg. ID: Enter the company's manufacturing ID here up to an eight-character maximum. This id will be used as a prefix in the carton id as well as the VICS BOL number for EDI compliance.
Pick\Pack tree behavior
Allow drag-drop of EDI items in shipment tree: Checking this box will allow the user to drag and drop items from one EDI package in the tree to another item in the tree.
Auto rebuild shipping tree (repetitive transactions): When adding items to a package in the shipping tree, the tree itself will refresh in the background after each item has been added. If this box is not checked, the items will be refreshed in the tree for that package after they have all been added and the window where items are added has been closed. NOTE: Checking this box may affect performance when adding items to packages as refreshing the tree after each item will slow the process of adding items down.
Shipping
Figure 3: Pick Pack Options-Shipping
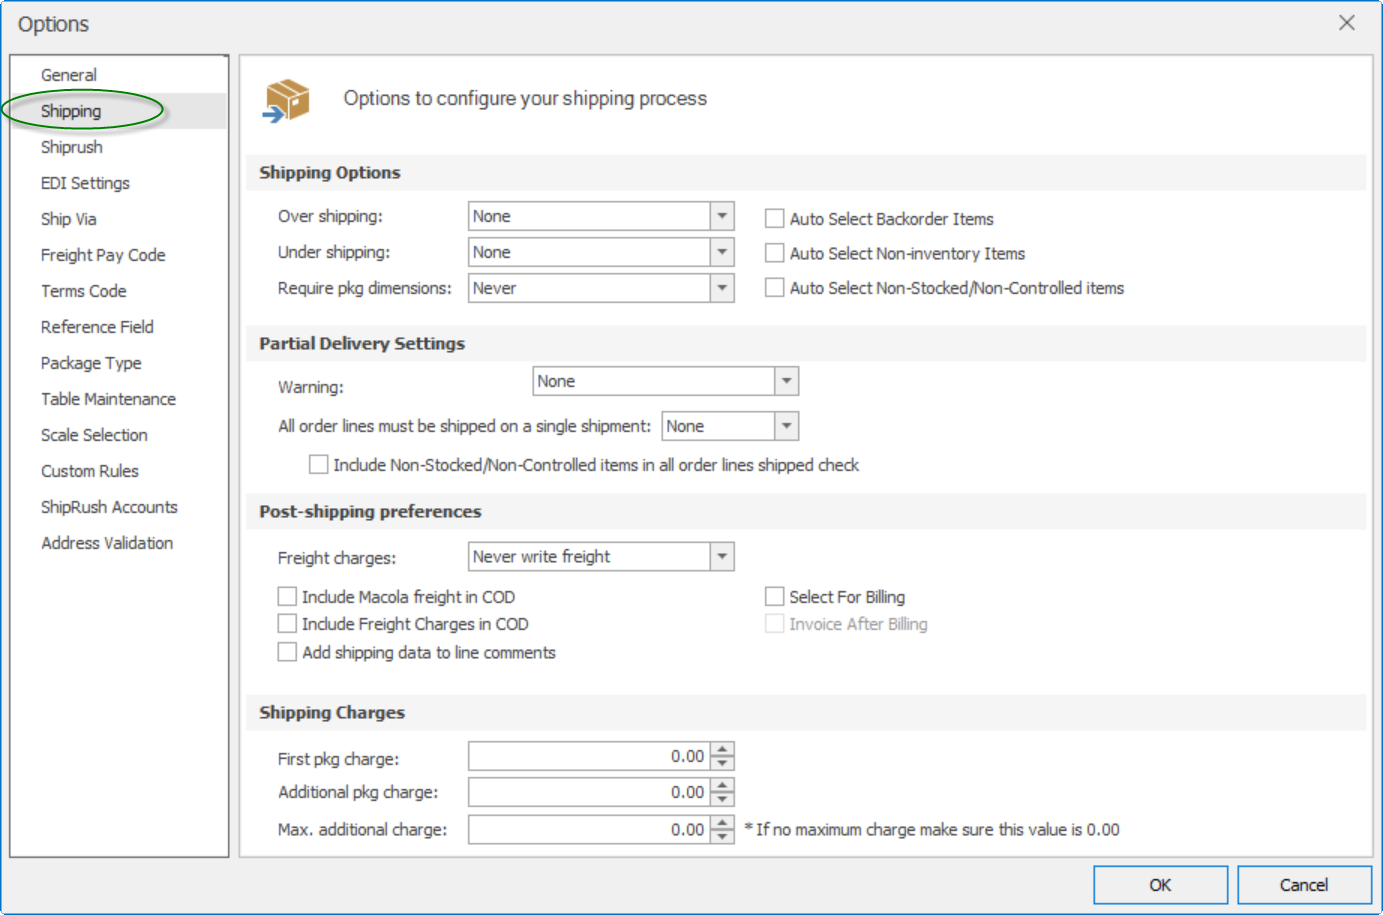
Shipping Options
Over shipping: Over ship is a line item on the shipment with a shipping quantity greater than the value on the Quantity to Ship field in Order Entry. Select from None, Hard or Soft warnings. A hard warning will not allow over shipping. A soft warning will alert the user, but allow the over shipment. If "None" is populated here, the user will be able to over ship without warning.
Under Shipping: Under ship is a line item on the shipment with a shipping quantity less than the value on the Quantity to Ship field in Order Entry. Select from None, Hard or Soft warnings. A hard warning will not allow under shipping. A soft warning will alert the user, but allow the under shipment. If "None" is populated here, the user will be able to under ship without warning.
Require pkg dimensions: Used to require FedEx and UPS Package dimension definition. If used, Package dimensions must be setup in the Package Type options. Select from Never, FedEx Only, UPS Only, and FedEx & UPS. When set to FedEx Only, every package on a FedEx shipment will be validated to ensure the dimensions of that package have been entered. If a package is found without dimensions, the user will be prompted to enter dimensions for that package before the confirm shipping process will continue. When set to UPS Only, every package on a UPS shipment will be validated to ensure the dimensions of that package have been entered. If a package is found without dimensions, the user will be prompted to enter dimensions for that package before the confirm shipping process will continue. When set to FedEx & UPS every package on a FedEx or UPS shipment will be validated to ensure the dimensions of that package have been entered. If a package is found without dimensions, the user will be prompted to enter dimensions for that package before the Confirm Ship process will continue. If set to Never the system will not ask for dimension validation.
Auto Select Backorder Items: A Backorder item is when there is a Quantity on Order but a Quantity to Ship of 0 in Order Entry. When this box is checked, backorder items on a packed order will be automatically selected during the Confirm Ship process and appear on the invoice.
Note: This options will NOT be enforced for customers who have the Allow Partial Delivery flag set to false.
Auto Select Non-inventory Items: Non-inventory items are any items on an order that are not in the Inventory Item Master table. When this box is selected, this non-inventory line items on a packed order will be selected to be included in the Confirm Ship process and appear on the invoice.
Auto Select Non-Stocked/Non-Controlled Items: Items that are on an order and are in the Inventory Item Master setup as Non-Stocked/Non-Controlled. Selecting this option will cause non-stocked/non-controlled line items to be included in the Confirm Ship process and appear on the invoice.
Partial Delivery Settings
Warning: This will check the Macola Customer record for the Allow Partial Delivery flag. A check will be made of each item packed on the shipment comparing the quantity shipping to the Order Entry Quantity on Order. Select from None, Hard or Soft warnings. A hard warning will not allow partial shipping. A soft warning will alert the user, but allow the partial shipment. If "None" is populated here, the user will be able to ship a partial shipment without warning.
All order lines must be shipped on a single shipment (back-order flag must be turned off):
This option checks to make sure all line items from the order in Order Entry have been included in the shipment.
Example of how used: If you want every line on every order to ship complete, then set the Under Shipping setting above to “Hard” to prevent short shipping quantities and then also set the All order lines must be shipped on a single shipment to prevent under shipping any lines and also skipping a line on an order.
Include Non-Stocked/Non-Controlled items in all order lines shipped check: Selecting this option will cause non-stocked/non-controlled line items to be included in the Confirm Ship process
Post-shipping preferences
Freight Charges: This field applies to LTL, UPS, FedEx and USPS shipments in Pick Pack that are PREPAID only. Select one of the options:
Never Write Freight - never write back any freight charges to the Macola Order Entry Order header table.
Prompt for Freight - Pops up a window that shows the freight amount returned from ShipRush or the amount entered on the BOL screen for LTL shipments and asks the user if they want to record the freight. If they answer Yes, the freight amount displayed will be written back to the Macola Order Entry Order header table and if No, it is not recorded.
Always Write Freight - Pick Pack will always write the freight amount returned from ShipRush or the amount entered on the BOL screen for LTL shipments to the Macola Order Entry Order header.
Include Macola freight in COD: If checked, Pick Pack will take the value presently in the Frt_amt filed on the order header and add it to the total price of the line items to get the total COD amount.
Include Freight Charges in COD: This value is used to set a flag on the ShipRush Shipping SDK called AddShippingChargesToCOD. This is only set on the first package.
Add shipping data to line comments: This option will add shipping data to the line comments on the Macola order line.
Select for Billing: Checking this box will select orders for billing automatically after they have been confirm shipped thus eliminating the need to do "Select for Billing" in Macola or WiSys.
Invoice After Billing: Checking this box will invoice orders after billing automatically and thus eliminate the need to manually select for invoicing in Macola or WiSys. This option is not available unless the “Select for Billing” is also selected.
Shipping Charges
The options are intended to allow configuration of additional charges to automatically be added to the shipping charges processed through ShipRush. An example might be a base package fee and adding a per package fee.
First pkg charge: Enter the amount of the first package shipping charge if used here.
Additional pkg charge: Enter the amount of additional package shipping charges here.
Max. additional charge: Enter the amount of the maximum additional charge for package shipping here. NOTE: If no maximum charge make sure this value is 0.00
ShipRush
Figure 4: Pick Pack Options-ShipRush

Hunderedweight contract
Contract CWT threshold: Applies to UPS shipments only and only to those customers who have the service included in their contract and have a daily pickup. Enter the weight in pounds at which your hundredweight discount applies.
Shipping labels
From address definition: This will determine the Macola table that is used to pull your company information for Shipping. Select from:
Company Table - From address defined in the Macola company table
Location Table - The from address will be set to the address defined for the location used on the Macola Order Header
Location Company Name from Company - The from address will be set to the address defined for the location on the Macola Order Header but the name will be set to the Company name defined in the company table.
Label Reprint: You may setup a Label reprint and Archive file location to store your ShipRush labels to allow you to reprint if necessary. You may also automatically move your labels to the Archive location. To utilize, contact your WiSys consultant.
Miscellaneous
Special Shipments: This applies to the UPS and FedEx WiSys interface shipping screen. There is an option of “Special Shipment”. Selecting this option will pull up the ShipRush interface screen to ship from following the WiSys interface screen. This is to allow the user to make changes in the ShipRush interface directly. If this box it not select, it ships directly from the WiSys shipping interface without pulling up the ShipRush integration screen. Checking this box will set the “Special Shipment” to be automatically selected in the WiSys UPS/FedEx shipping interface and therefore pull up the ShipRush integration interface screen. .
Insurance declared value: Select from Standard, Total Order Line Price, and Total Order Line Cost.
ShipRush license: Enter your ShipRush license in this box. As well as entering it in the ShipRush setup, it is also required to be entered here for shipping small packages within Pick Pack.
Auto ship: This feature prevents the user from seeing the carton weights interface screen during shipment.
· Not Used - The user will see the carton weights interface screen for each shipment so they can make changes if necessary.
· Weights only - Pass the carton weights to the interface and bypass the screen.
· Weights and Dimensions - Pass the carton weights and the dimensions from the item master in Macola and bypass the screen.
Use ShipRush Discount Postage when shipping USPS: Check this box to ship USPS through ShipRush. ShipRush Discount Postage is the supported USPS platform used by ShipRush. An account is required to be setup through the ShipRush installation process.
EDI Settings
Figure 5: EDI Settings
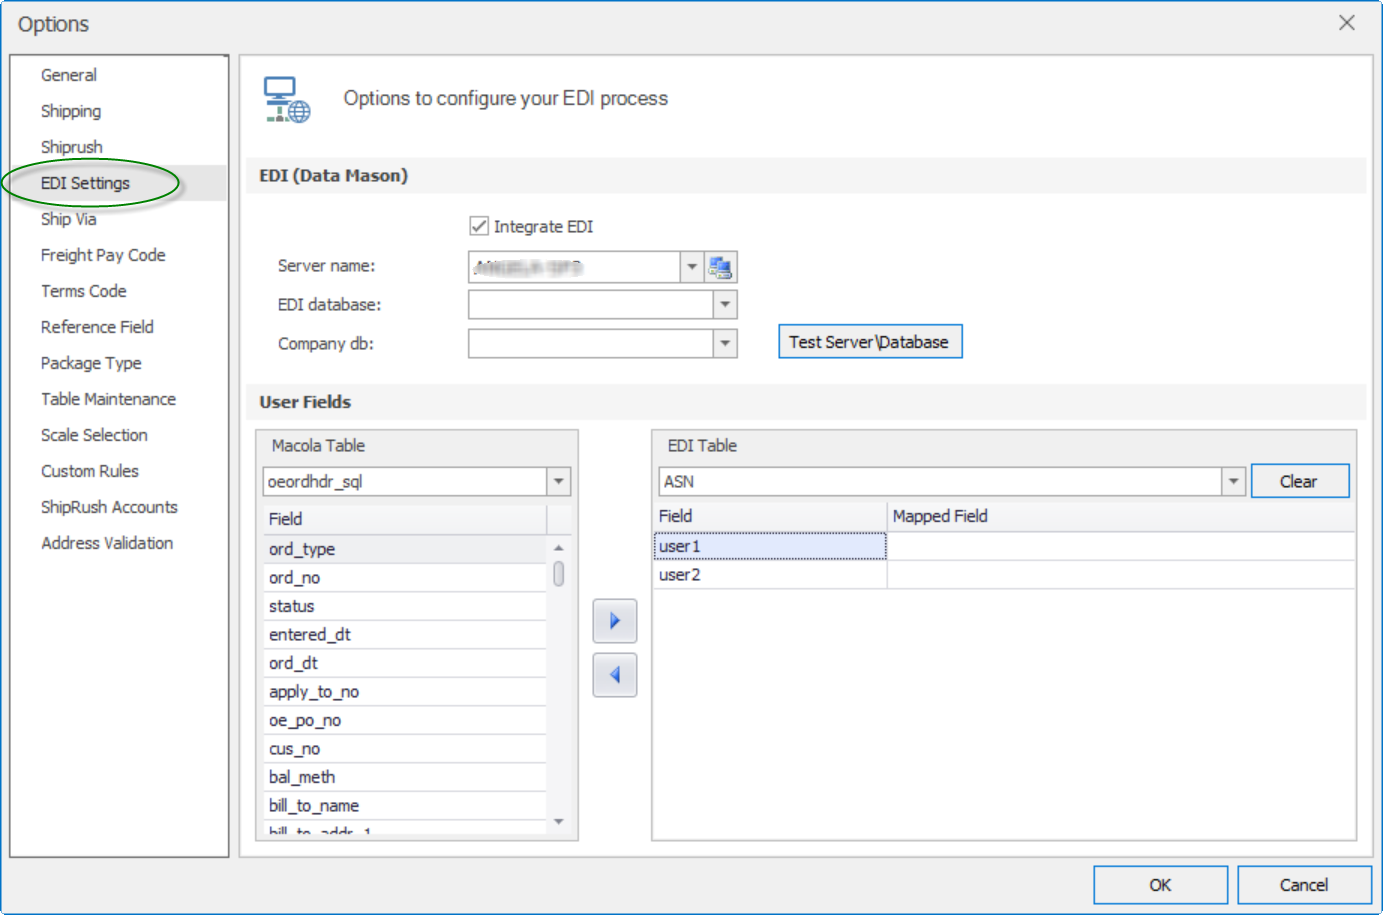
Integrate EDI - Check this box to automatically integrate WiSys shipments with Data Mason’s EDI
EDI Database - Select the production Data Mason’s EDI Database from the drop down list.
Company Db - Select the Data Mason’s company database from the drop down list
To successfully integrate WiSys with Data Mason’s EDI software, the following must be true:
· EDI must be turned on using the options defined under Agility\Options\Pick Pack\EDI Settings
o Integrate EDI must be checked
o Entries must be made for “Server name”, "EDI Database" and "Company db"
· You must have a package on the shipment that has been flagged as an EDI package. This is defined in Agility\Options\Pick Pack\Package Type.
· The OE order must be flagged as an EDI order (OEORDHDR_SQL.EDI_FG = ’Y’)
· The item number on the order must exist in the EDI database (ITEM.INT_ITEM_NO = [Item_no on order])
· In addition to the item number existing in the ITEM table the ITEM.SAC_FLAG must be 0.
· The customer number on each order must exist in the EDI database (TRADE.TP_ID = [Cus_no on order header]).
o OR if running Macola ES the customer number on the order header may have a Parent Customer defined in "Customer Maintenance". If the customer has a Parent Customer, and the Child Customer number was not found in the EDI database TRADE table the Parent Customer Number will be used to validate against the EDI TRADE table.
User Fields: The user fields can be used to send data that is contained in the Macola order tables to the EDI tables. To map the data, select the drop down on the EDI table to pick the desired table and highlight the EDI field to send data to. Next you will be able to select the Macola Table and field select data from and click the arrow to map data to be sent to qualifying EDI order for the EDI tables as shipments are processed.
Custom Rules
If needed, your WiSys consultant will work with you for any custom rule options.
Ship Via
Figure 6: Ship Via Mapping
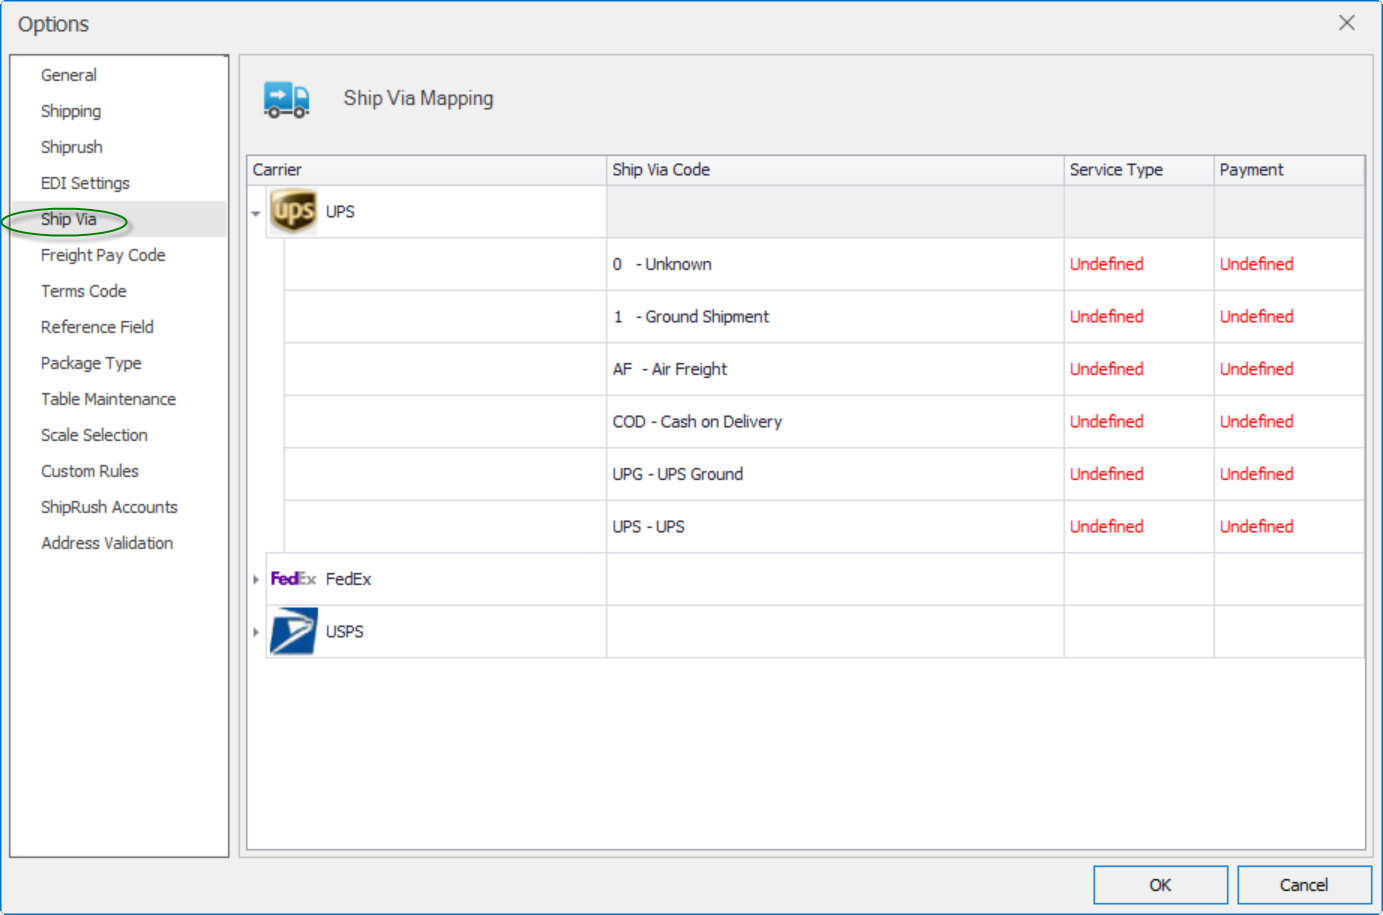
Use this screen to map Macola Ship Via codes for small package shipments to the proper UPS/FedEx/USPS service type and payment method.
UPS Service Types:
- Please refer to the UPS web site for definitions of their service types.
http://www.ups.com/content/us/en/shipping/time/service/index.html?WT.svl=PNRO_L1
UPS Payment Methods:
- Prepaid- Sender is paying the freight and freight charges may or may not be written back to Macola depending on the "Freight Charges" setting selected in the Agility - File- Options - Pick Pack - Shipping section.
- Freight Collect- Recipient is billed directly for the freight
- Consignee Billed- someone other than the sender or receiver is paying the freight such as a freight forwarder.
- Third Party- Neither the sender or the receiver of the goods is paying for the freight. In this case, a third party is paying with their UPS account number and must have an entry in the Agility - File - Options - Pick Pack- Table Maintenance - Third Party section for this feature to function correctly.
- No Freight- Sender is paying for freight and thus there are no charges recorded to be billed back to the customer.
FedEx Service Types:
- Please refer to the FedEx web site for definitions of their service types.
http://www.fedex.com/us/service-guide/choose-service/package-shipments/us-packages.html
FedEx Payment Methods:
- Sender- Sender is paying the freight and freight charges may or may not be written back to Macola depending on the "Freight Charges" setting selected in the Agility - File - Options - Pick Pack - Shipping section.
- Collect- Recipient is billed directly for the freight
- Recipient- The shipment’s recipient is charged.
- Third Party- Neither the sender or the receiver of the goods is paying for the freight. In this case, a third party is paying with their UPS account number and must have an entry in the Agility - File - Options - Pick Pack - Table Maintenance - Third Party section for this feature to function correctly.
- No Freight- Sender is paying for freight and thus there are no charges recorded to be billed back to the customer
- Freight Pay Code- This entry uses the freight pay code field entered on the Macola order header. For example: If the Ship Via code on the Macola order header is FXG and the freight pay code is "Prepaid", the order will be sent via FedEx Ground and Prepaid.
USPS Service Types:
- Please refer to the USPS web site for definitions of their service types.
https://www.usps.com/ship/mail-shipping-services.htm
USPS Payment Methods:
- Prepaid- Sender is paying the freight and freight charges may or may not be written back to Macola depending on the "Freight Charges" setting selected in the Agility - File - Options - Pick Pack - Shipping section.
- No Freight- Sender is paying for freight and thus there are no charges recorded to be billed back to the customer
- Freight Pay Code- This entry uses the freight pay code field entered on the Macola order header.
Freight Pay Code
Figure 7: Freight Pay Code Mapping
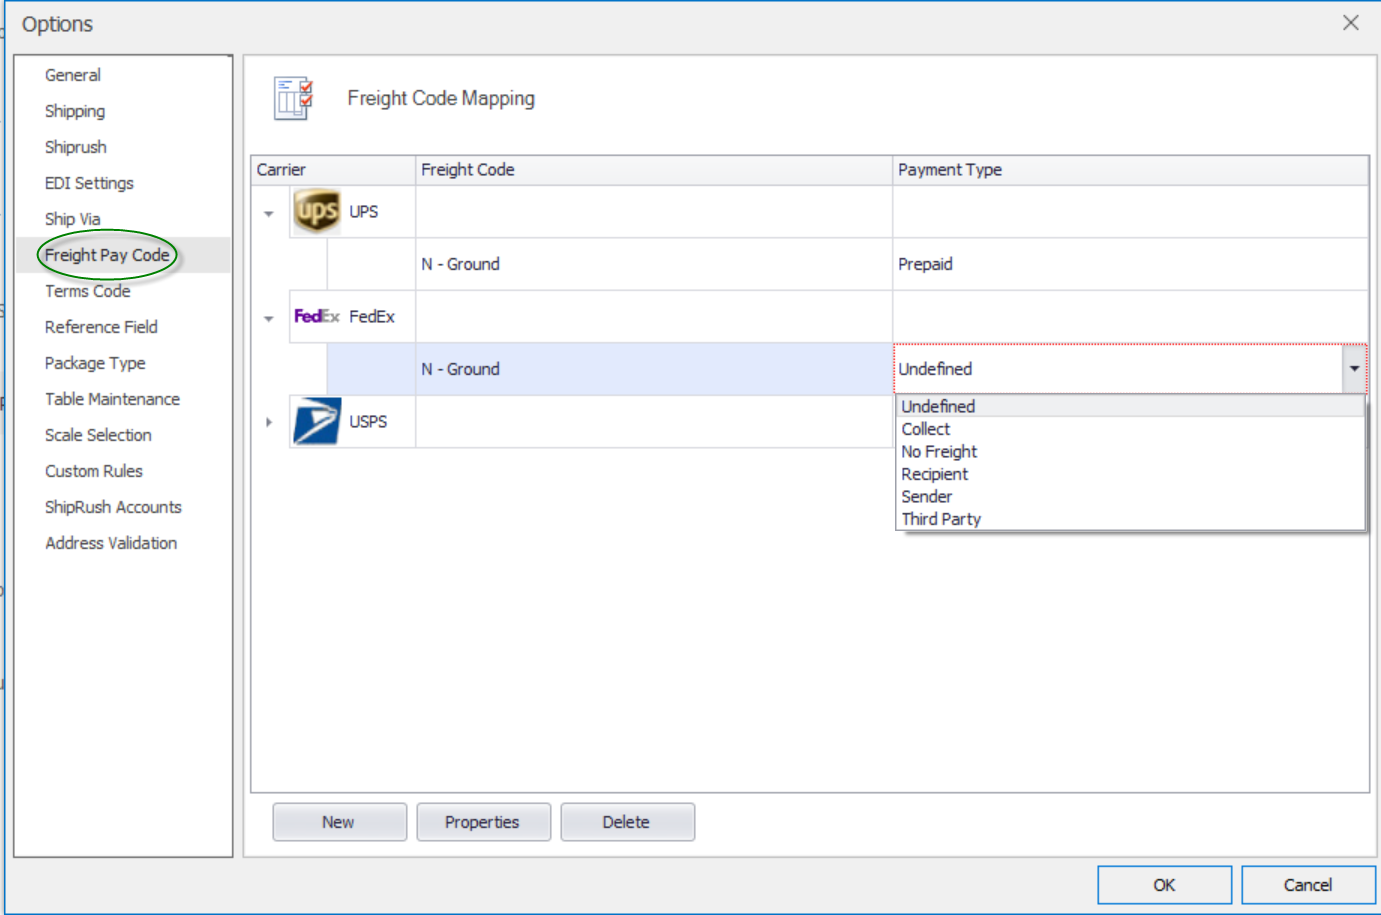
Use this screen to map Macola Freight Pay codes to the proper payment type for UPS/FedEx/USPS. Both Macola ES and Macola Progression have three default Freight Pay Codes. They are N = None (No Freight), C = Collect and P = Prepaid.
To map a freight pay code for a carrier, select the carrier and click the New button. Enter the Pay code and a Description from Macola (N, C or P) you wish to map Next, highlight that Freight Code under the carrier and select the drop down under Payment Type to map. For example: Carrier = UPS, Pay Code = N, Description = No Charge and that is mapped to Payment Type = No Freight.
Note: Once a Pay code has been entered, it is available under all carriers.
For the remaining carriers, select the Freight Code you wish to map from the drop down and repeat the Payment Type mapping process.
Terms Code
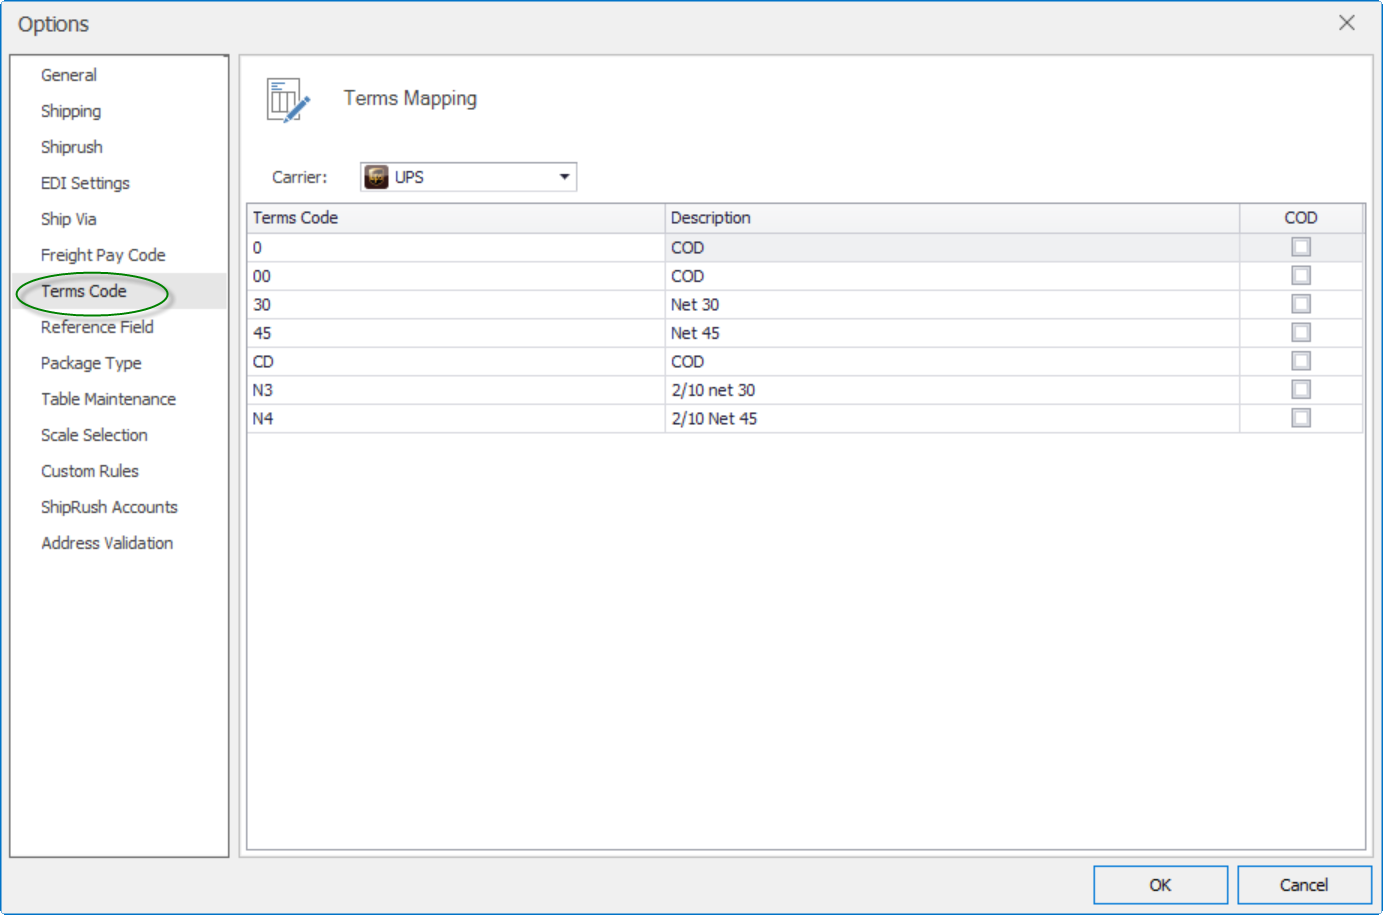
Use the terms code mapping screen to check the COD box for those orders that need to be flagged as COD when shipping small packages.
Figure 8: Terms Code Mapping
Reference Field
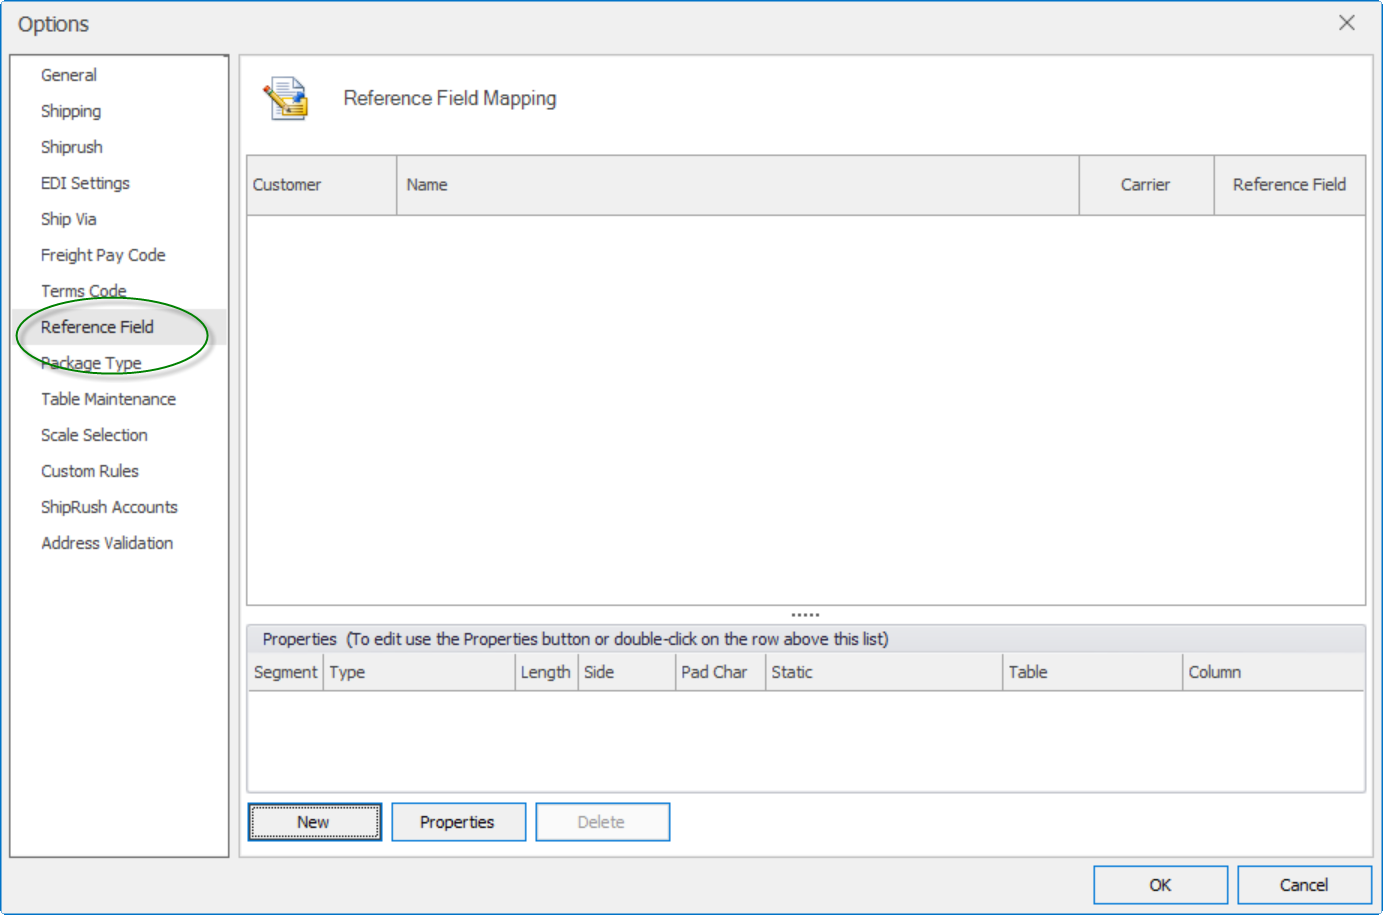
Reference Field Mapping is used to map data to the reference fields that appear on a UPS, FedEx or USPS shipping label. Reference fields can be the same for all customers or specific to individual customers. For example: If your company would like to see the Macola order number on all labels in reference field one for all UPS and FedEx orders, that would be configured as follows:
Open the Reference Field Mapping screen and click the New button as shown in Figure 9 below:
Figure 9: Reference Field Mapping
The Reference field mapping Properties - Add screen below in Figure 10 will appear.
Figure 10: Reference field Mapping Properties-Add
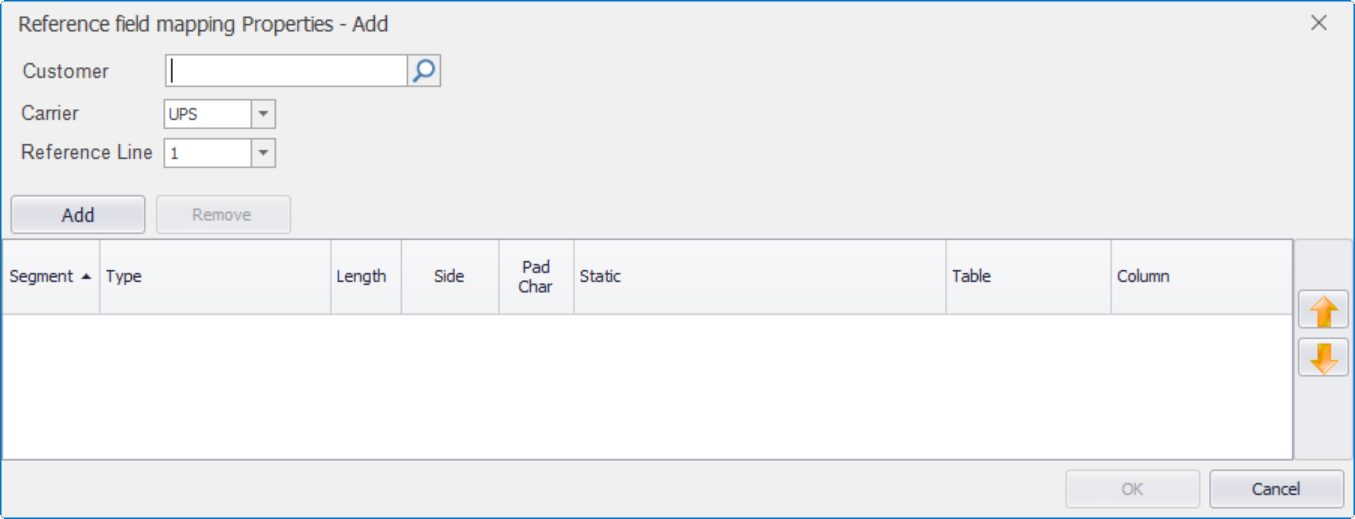
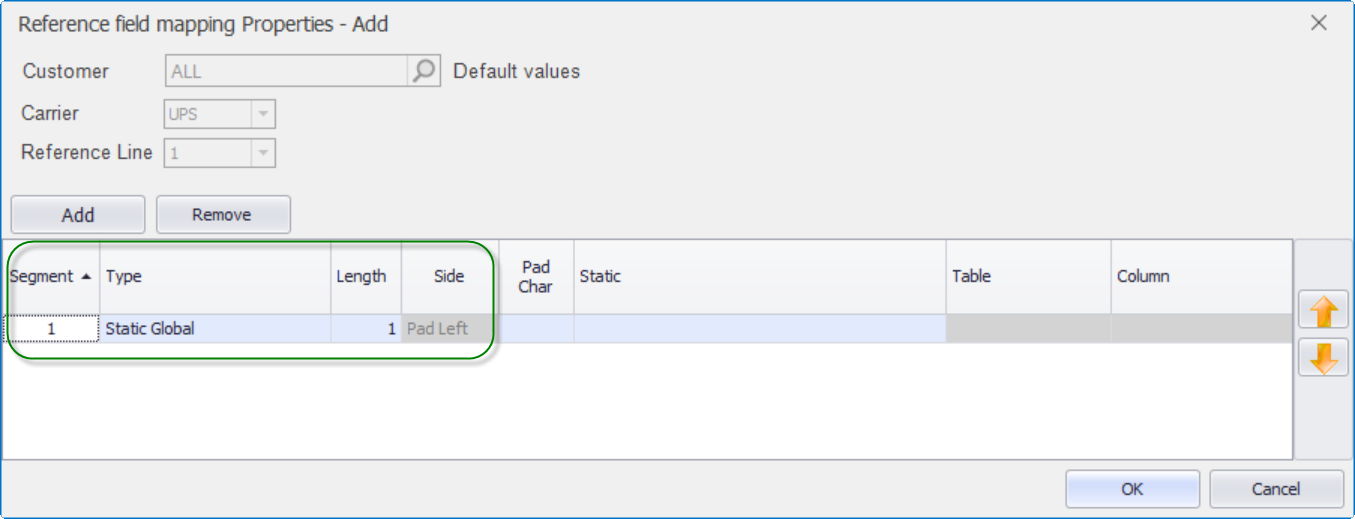
Since we are adding this reference for ALL customers, there is no need to select a specific customer. We simply want to select the carrier, in this case UPS, and the Reference Line, which we want to be 1, and then click the "ADD" button. The first Segment to our Reference Line will be added as shown in Figure 11 below:
Figure 11: Reference Line Segment
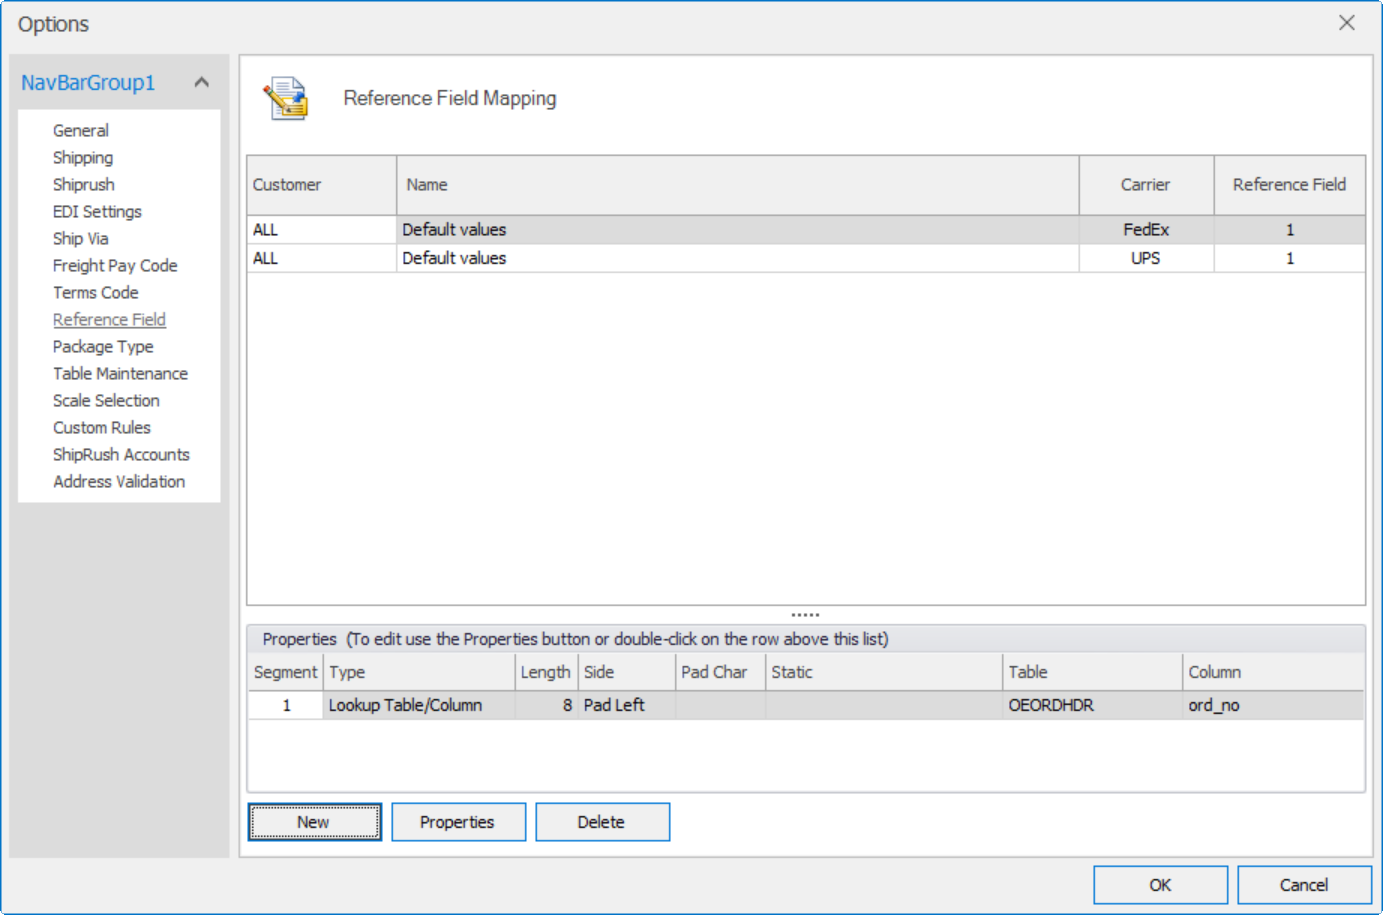
Next, we want this segment to be equal to the Macola Order Number from the database, so click on the "Static Global" to change the Segment Type. Here we want to select Lookup/Table Column. Again, the screen will change to reflect this new Type and we need to tell it how much of the order number we want to show. In this case, we are going to select the complete order number, so we need to set the length field to 8, the Table to oeordhdr_sql, and the Column to Ord_no because this is the table and column where the Macola Order Number is stored. This is shown in Figure 12 below:
Figure 12: Completed Segment to set Reference Line 1 to Macola Order Number

Select OK to save this and repeat the process above only select FedEx as the carrier this time. Press OK to save and then Cancel to return to the Reference Field Mapping screen and your screen should look like that in Figure 13.
Figure 13: Complete Segments for UPS and FedEx labels to have the Macola Order Number appear in Reference Line 1 of all shipments
Our next example, demonstrates how to fulfill a requirement from our customer Outdoor Adventure Outlet to always put their three character company initials followed by their purchase order number in Reference Line 2 of their FedEx shipments. Begin by clicking the Add button to add a new mapping. This time we want to use the lookup to select a specific customer (901 – Outdoor Adventure Outlet), Carrier = FedEx and Reference Line = 2. Again we click the Add button to add our first segment. This segment will be Static Global as we are not selecting anything from the database or using any other pre-defined segment types but hard coding the first four characters to be the company initials followed by a dash as a separator. The completed segment should look like that in Figure 14 below:
Figure 14: Completed Static Segment 1 for Outdoor Adventure Outlet Reference Line 2
Next, click OK to save the first segment and then reselect customer = 901, carrier = FedEx and Reference Line 2. You will see the first segment appear in the segment section below and we want to click Add again to add the next segment. We want segment 2 to be a Lookup Table/Column type with a length of 15 and then select the oeordhdr_sql table and the oe_po_no column to get the customer’s PO Number. Your final configuration for this Reference field should look like Figure 15 below:
Figure 15: Final configuration of Outdoor Adventure Outlet Reference Field 2
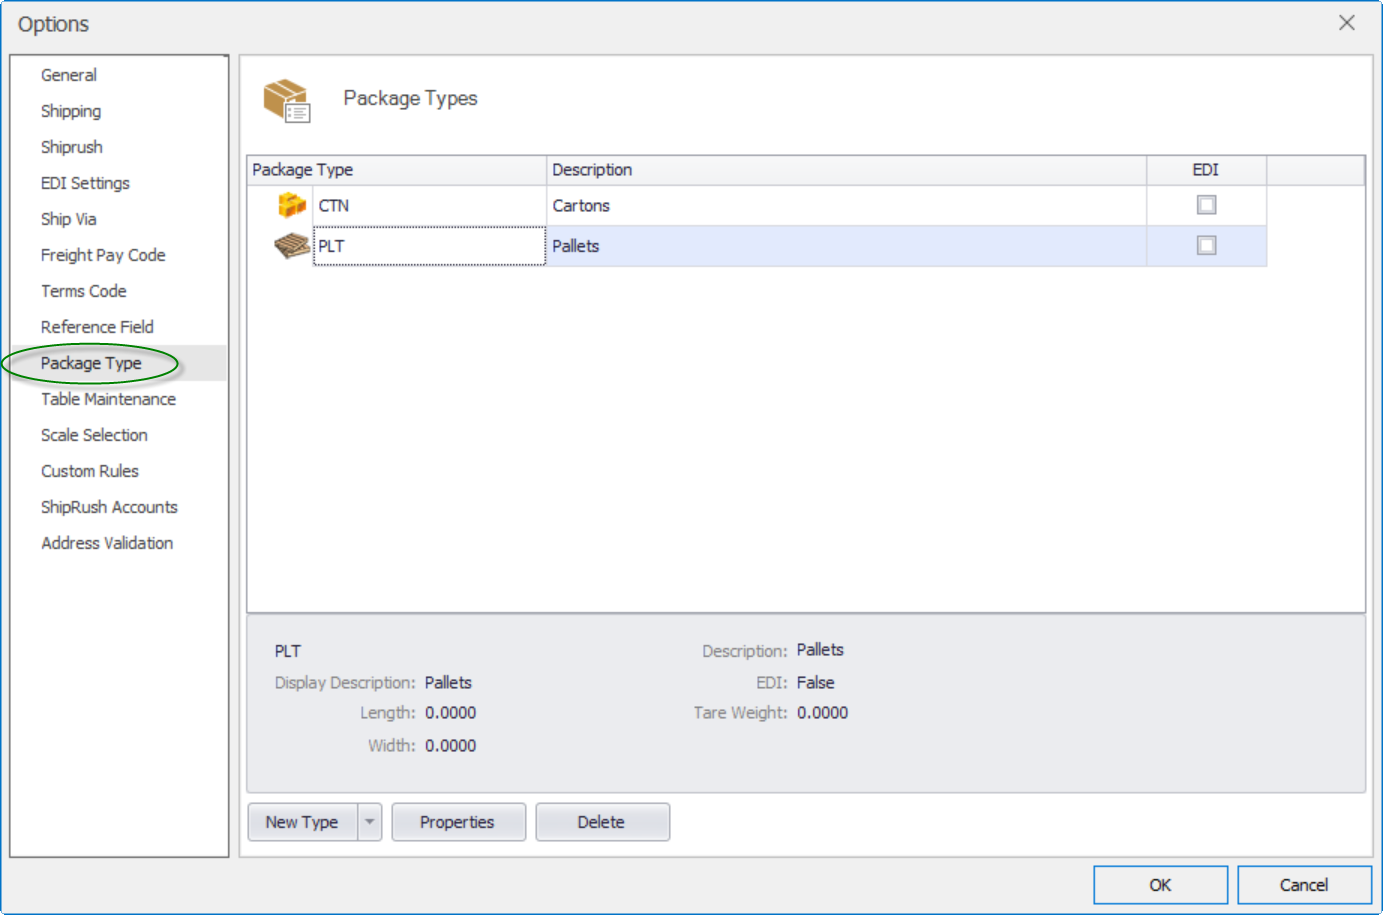
Package Type
Package Types are used to define the types of packages that will be shipped using the WiSys Pick Pack software. By default, the system comes defined with PLT - Pallet and CTN - Carton. You can pack Pallets by themselves or Cartons on Pallets as the system by default also requires that a carton must be contained within a pallet. In other words, it has to have a parent relationship. Our system only allows you to configure one level deep for parent relationships. You CANNOT have a baggie that requires a Carton that requires a Pallet. Also, you can only have one Package Type defined as an EDI package if you are integrating with EDI. This is because you cannot mix package types on a shipment and send a successful ASN.
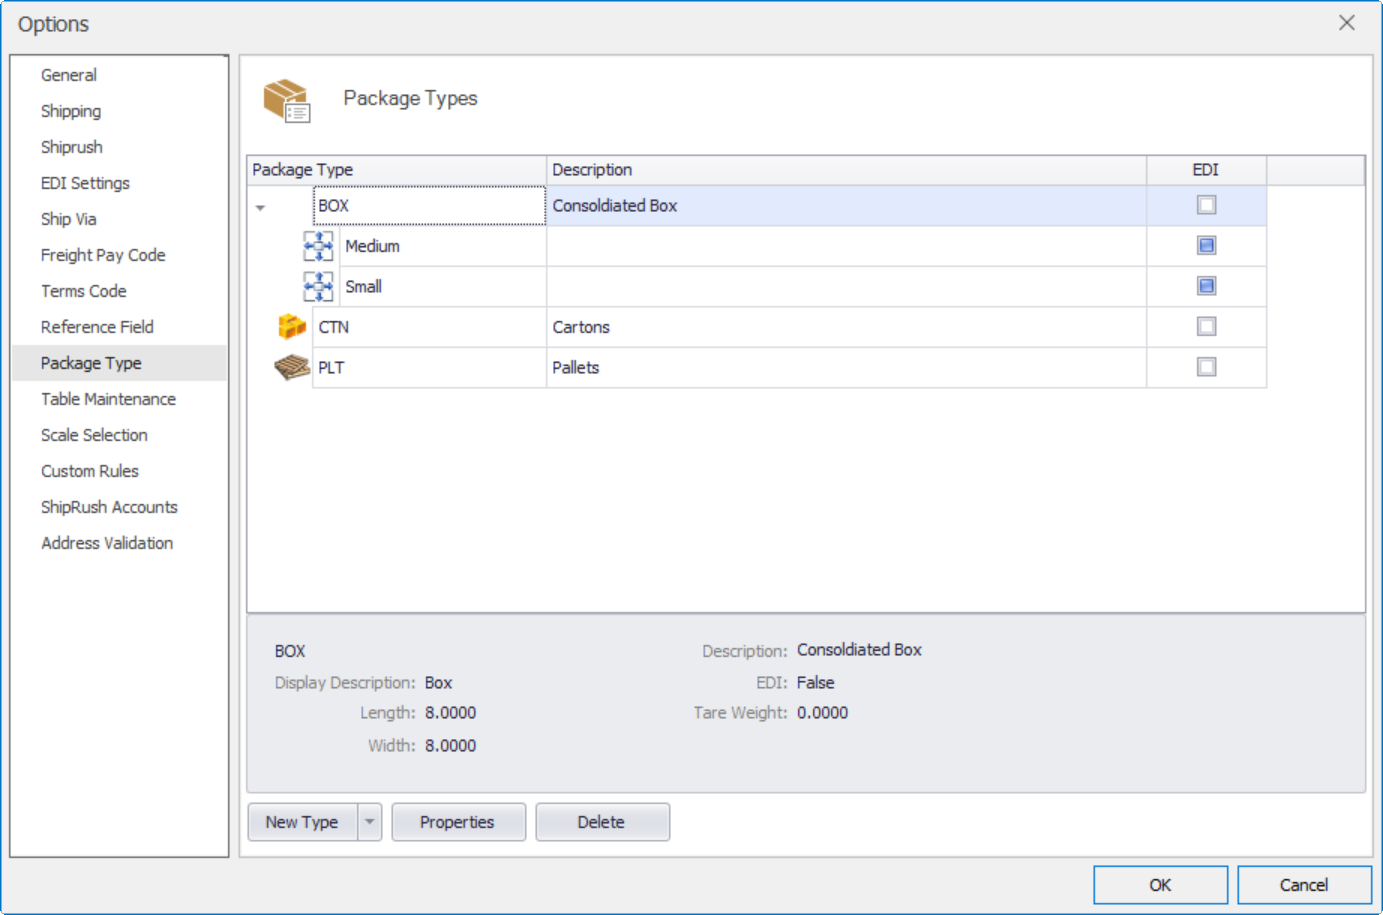
Figure 16: Package Type
To add a new Package Type, click the New Type button and select New Type from the drop down list OR right click the mouse anywhere on the Package Type screen and select New Package Type from the menu. A screen will open like the one in Figure 17 below.
Figure 17: Package Type Properties
Enter the name of your Package Type, a Description, a Display Description (this is the one used within the Pick Pack applications) and whether or not this package has a parent package relationship and if that relationship is required. The first three fields are the only required fields.
If the package dimensions and weights are known and consistent for this package type, they can be entered here. If they are included here, each time this package is added to a shipment, these dimensions and weights will carry over to the shipment. If they are not consistent, it would be best to leave these fields blank here and later define Package Sizes for this Package Type.
Next, select whether or not this is an EDI Package. This tells the system to process this package type and integrate it with EDI to create ASN’s. Remember, you can only have ONE EDI package defined in the system at a time.
Finally, indicate whether or not this is an Active package type that can be included on a shipment and click OK to save the new Package Type.
To add a new Package Size for a Package Type, make sure the Package Type is selected on the screen and then click the New Type button and select New Size from the drop down list OR you can Right Click on the Package Type and select New Package Size from the menu. A screen will open like the one in Figure 18 below.
Figure 18: Package Size Properties
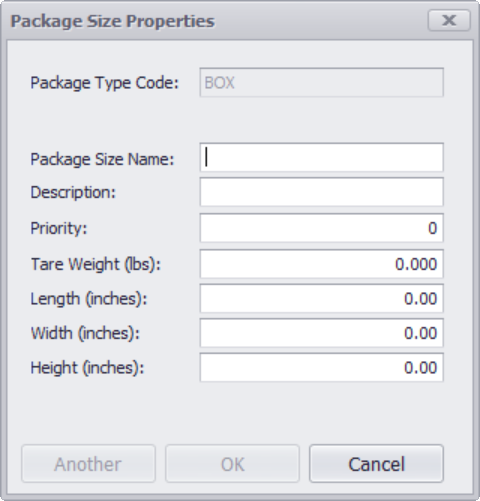
Enter the name of your Package Size, a Description, Tare Weight and Dimensions. The Package Size Name field is the only required field, however, FedEx and UPS are requiring all packages have dimensions effective January 1, 2015. If Package Sizes are being utilized, we strongly recommend adding the dimensions, especially if shipping small packages via UPS or FedEx. If you have more Package Sizes to add, click ANOTHER to add another size. Once all Package Sizes for this Package Type have been added, click OK to save and return to the Package Types screen. Figure 19 shows the Package Types screen after adding several Package Sizes to the Package Type ‘BOX’.
Figure 19: Package Sizes for Package Type = ‘BOX’ and Type = ‘CTN’
Note: When adding a Package Type to a shipment within Pick Pack, if there are NO dimensions defined for the Package Type that is added to the shipment, a screen will prompt the user to select the Package Size for that Package Type.
If there are dimensions defined for the Package Type that is added to the shipment, Pick Pack will use those dimensions and not prompt the user for the package size.
Table Maintenance
Figure 20: Table Maintenance

Third Party Accounts
Third Party accounts are used when the UPS/FedEx/USPS account are not billed to the sender (your company) or recipient (entity receiving the product) but in turn to a different entity. For example: YOUR COMPANY receives an online order for YOUR CUSTOMER'S CUSTOMER. YOUR COMPANY (sender) ships the order to YOUR CUSTOMER'S CUSTOMER (recipient) but needs to bill YOUR CUSTOMER'S (3rd party) UPS/FEDEX/USPS account for the cost of the shipment.
To set up a customer for third party billing, you must first obtain the third party UPS or FedEx account number and the EXACT address that account is billed to. If any part of the address is incorrect, the shipment will fail to go through as it will not validate correctly on the FedEx or UPS servers.
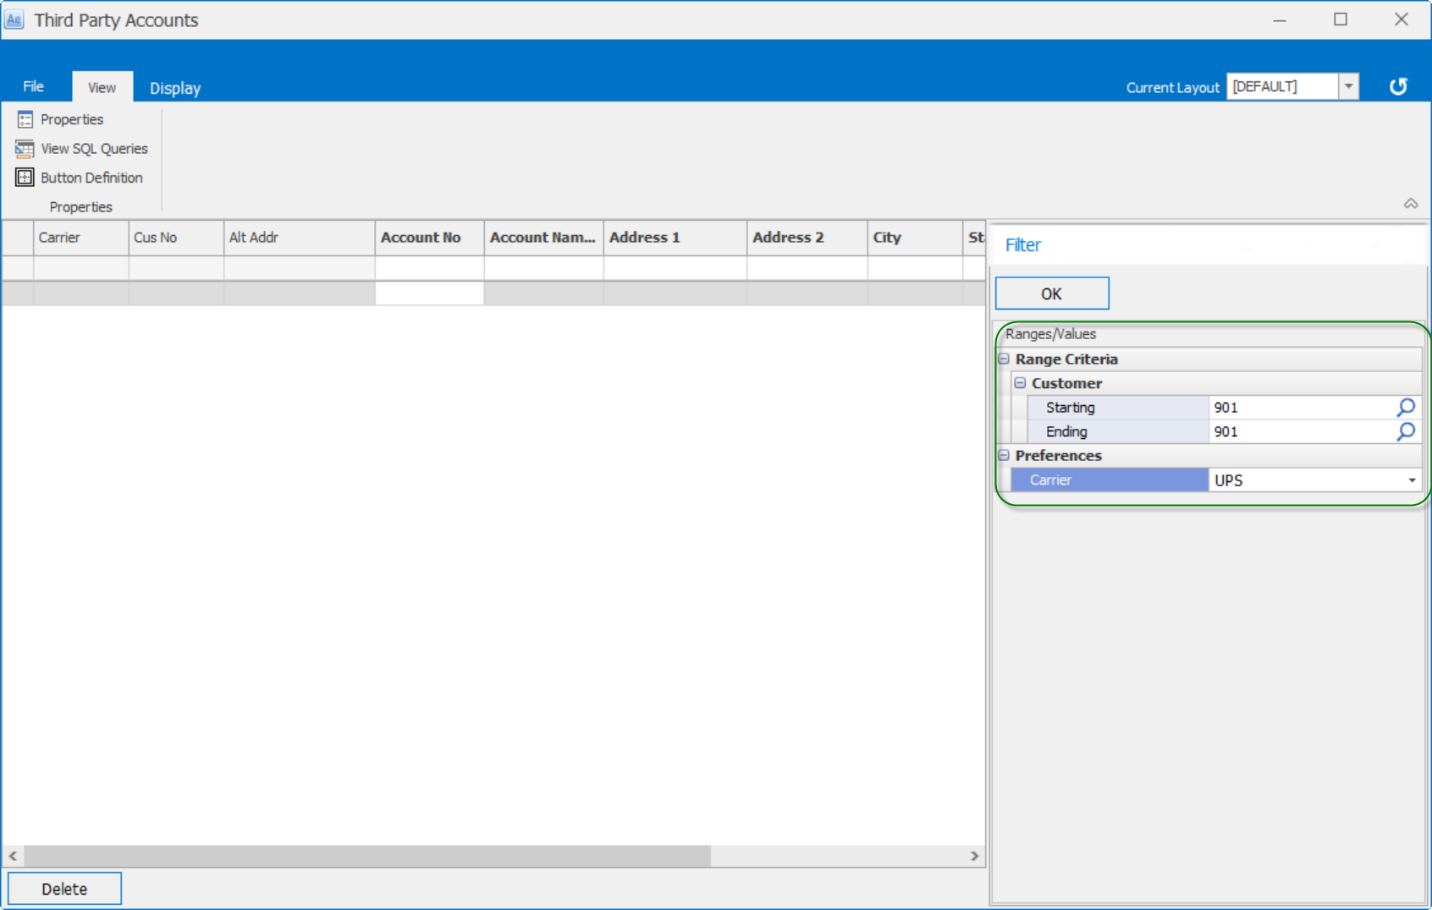
Once the account information has been obtained, proceed to Agility-File-Options-Pick Pack-Table Maintenance and click on the Maintenance button under Third Party Accounts. Once the screen opens, use the filter on the right to select the carrier and the customer you wish to configure third party for as shown in Figure 21 below:
Figure 21: Selecting customer and carrier for Third Party Shipments
Once the grid is displaying the correct customer and alternate address that needs set up for third party billing, you can begin entering the account number and address information related to that account number for the customer.
Note: If each alternate address has a different account, the account needs to be entered for that specific alternate address. However, if each alternate address uses the same account information, it can be entered in the "SAME" alt address line or the "[DEFAULT]" alt address line. When an order for a customer is marked as third party in Macola, our system will automatically check the exact alt address first, then the ’SAME’ alt address next (only if using Macola ES) and finally the [DEFAULT] alt address last. If no alternate address is found, the user will be presented with an error.
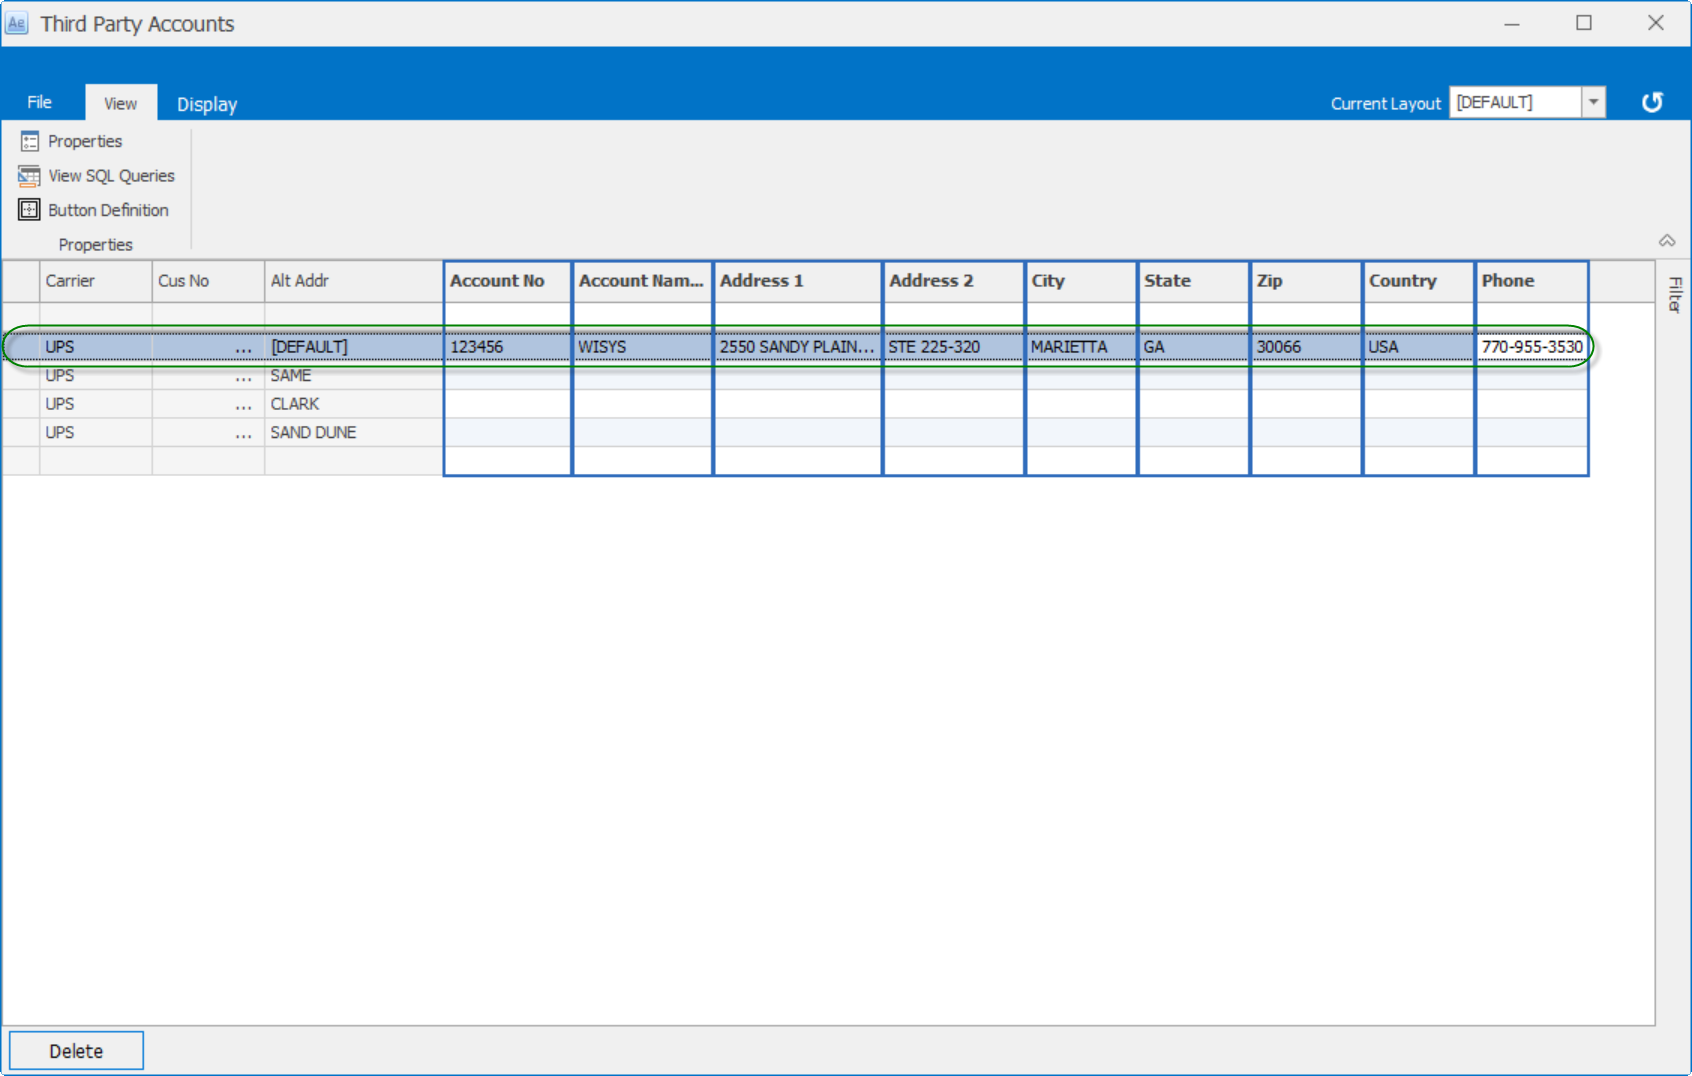
Once the proper account and address information has been entered, simply click in a field below that line to take focus off the line where data was entered and press the save button at the top of the screen to save the record. See the screen capture in Figure 20 below for a completed Third Party setup for customer 901.
Figure 22: Completed third party setup
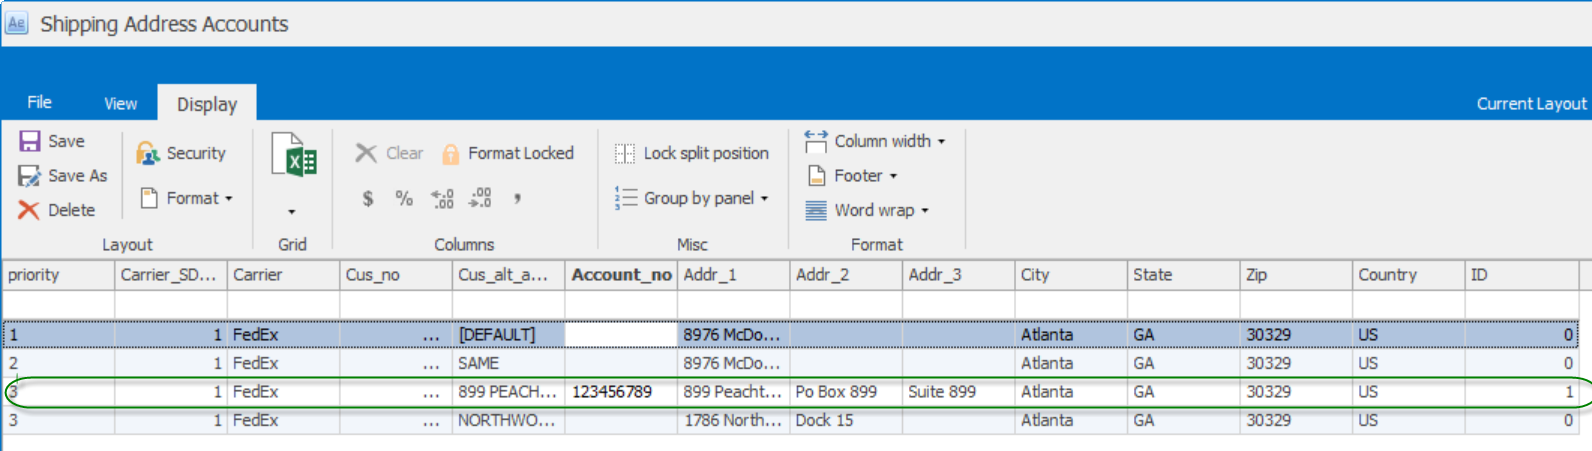
Shipping Address Accounts
Shipping address accounts are used to bill the UPS/FedEx/USPS charges to the recipient's freight account. For example: YOUR COMPANY receives an order from YOUR CUSTOMER. YOUR COMPANY (sender) ships the order to YOUR CUSTOMER (recipient) and needs to bill YOUR CUSTOMER's (recipient) UPS/FEDEX/USPS account for the cost of the shipment.
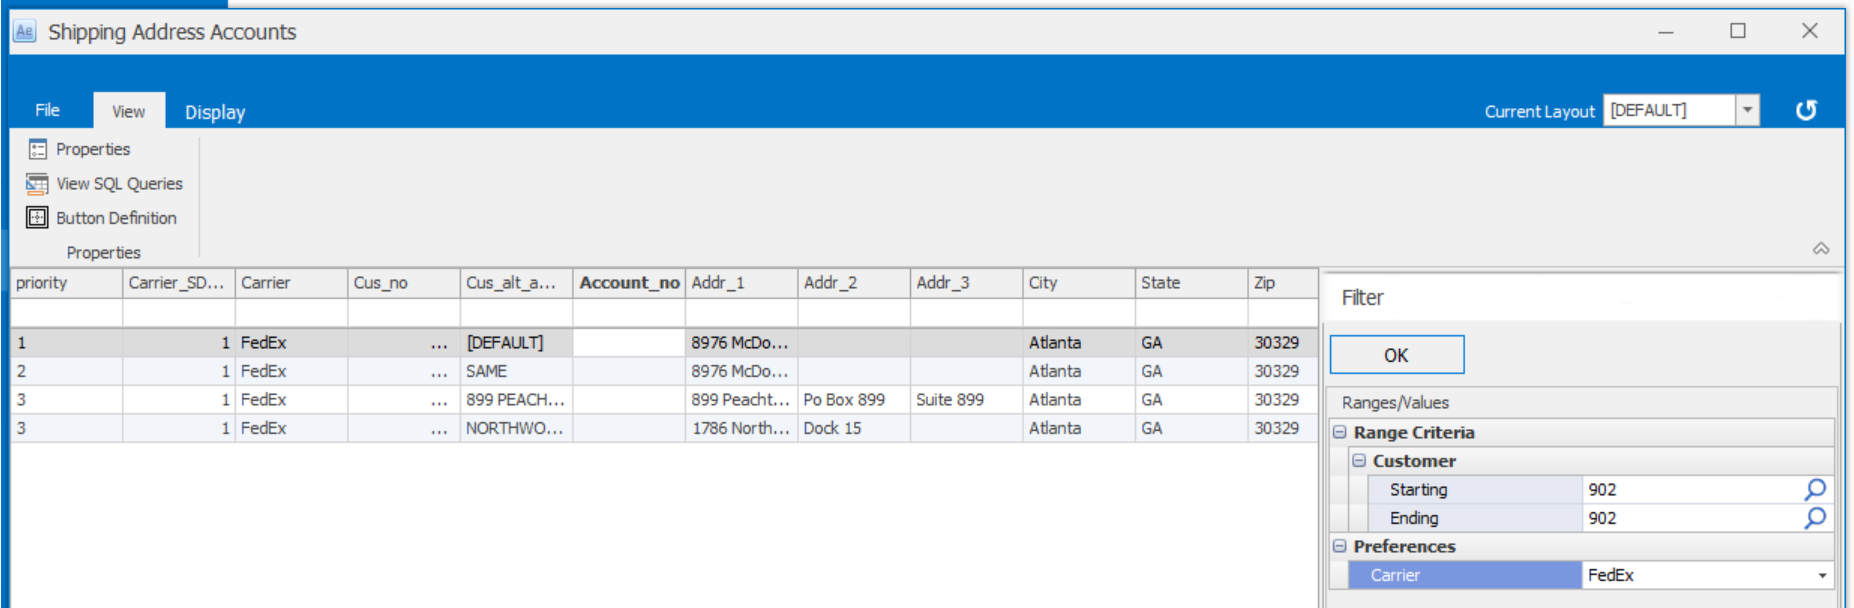
To set up a customer to bill their UPS, FedEx or USPS account, you must first obtain that account number from the customer. Once you have this information, proceed to Agility - File - Options - Pick Pack - Table Maintenance and click on the Maintenance button under Shipping Address Accounts. Once the screen opens, use the filter on the right to select the carrier and the customer you wish to configure thirty party for as shown in Figure 23 below:
Figure 23: Selecting customer and carrier for shipping address accounts
Note: Unlike third party accounts, since the recipient of the goods is the account holder, the address information is automatically filled in and you only need to obtain the account number. However, if the account number and the address on file do not match, the shipment will be rejected by the carrier’s computer servers.
If each alternate address has a different account, the account needs to be entered for that specific alternate address. However if each alternate address uses the same account information, it can be entered in the "SAME" alt address line or the "[DEFAULT]" alt address line. When an order for a customer is marked as collect in Macola, our system will automatically check the exact alt address first, then the "SAME" alt address next (only if using Macola ES) and finally the [DEFAULT] alt address last. If no alternate address is found, the user will be presented with an error.
Once the proper account information has been entered, simply click in a field below that line to take focus off the line where data was entered and press the save button at the top of the screen to save the record. See the screen capture in Figure 24 below:
Figure 24: Completed Shipping Address account billing setup
Drop Ship Address
Drop Ship Addresses are used to change the "From" address as it appears on the shipping label. When a shipment is shipped to a customer on this list, the defined customer name\address will be used as the Ship From Address. For example, if customer 903-Dirtworld.com receives a drop ship order for it's customer Bob's Bikes, and Bob wants the order to appear as if it has shipped from his location, you would enter that information in this table so the shipping label's "From" address is Bob's Bikes, and not Dirtworld.com.
To set this up in WiSys, proceed to Agility - File - Options - Pick Pack - Table Maintenance and click on the Maintenance button under Drop Ship Addresses. Once the screen opens, select the Add button to add a new Ship From address for the customer. This can be seen in Figure 25 below:
Figure 25: Entering a new ship from address for a customer in Drop Ship Address Maintenance
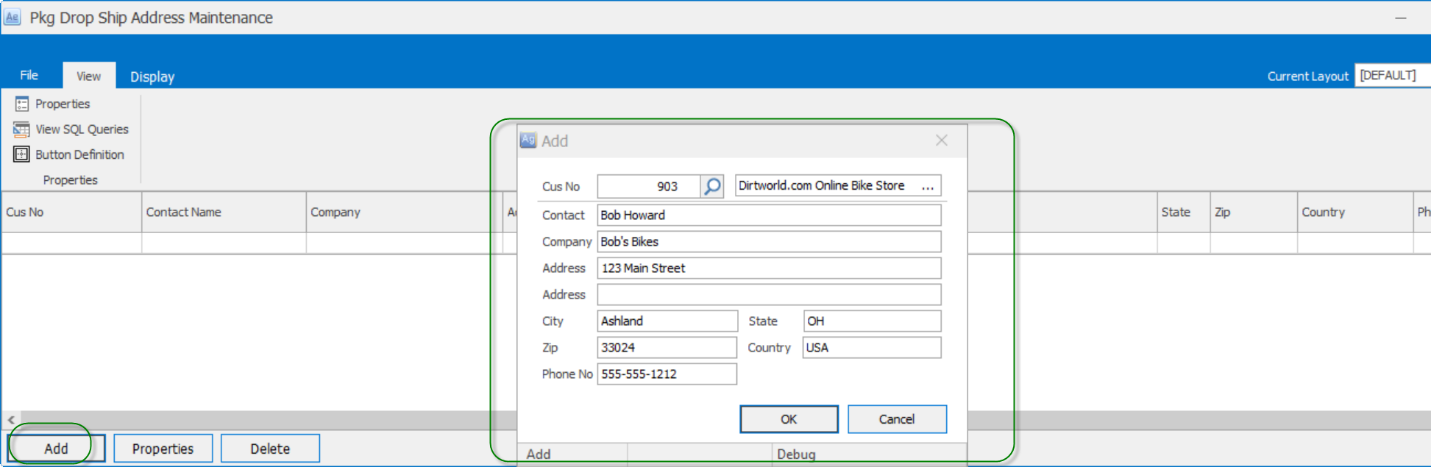
Click "OK" to save this screen and use the properties button to make any changes necessary for an entry, or the delete button to remove an entry if this customer no longer requires a different ship from address.
Bulk Conversion
The bulk conversion table allows for a one to many relationship between an item number in Macola and the case package amount in WiSys Pkg Pick/Pack. The setup is done by the case UPC code to tie the quantity and case package amount together. When the UPC code for the bulk package is scanned in Pick Pack Shipping Tree, the case quantity for that bulk amount is automatically used for the quantity with the dimensions and weight from the bulk package definition.
Click the Maintenance button to begin
Figure 26: Bulk Conversion Maintenance
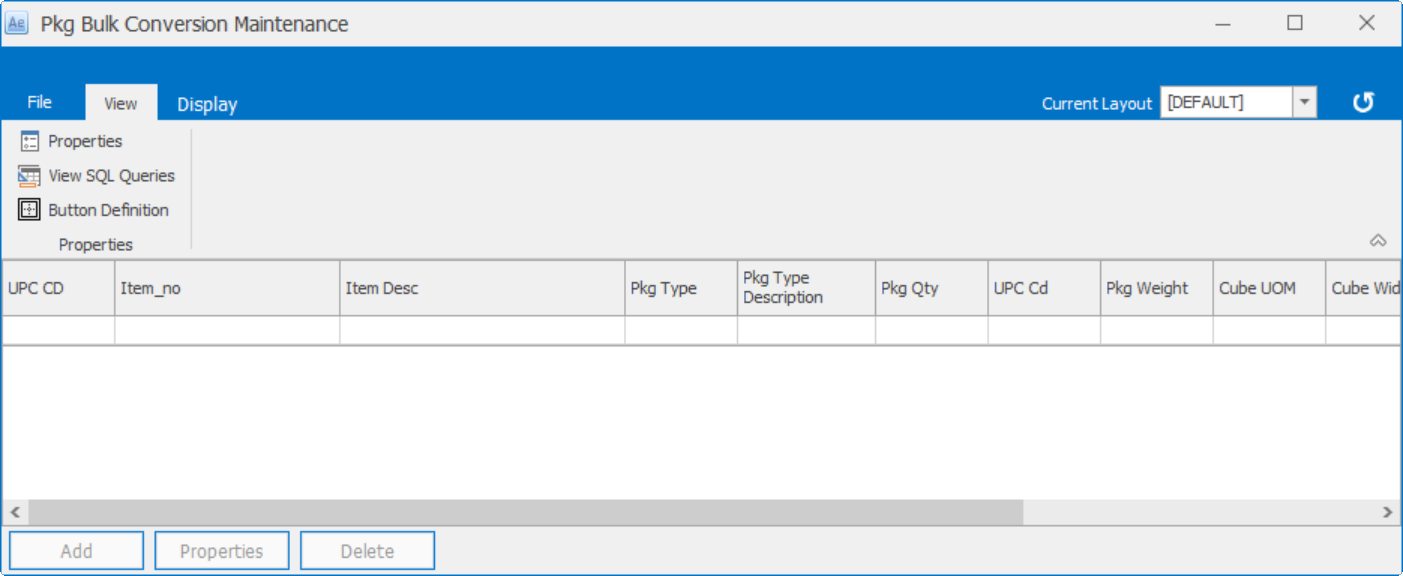
This will open the grid showing all existing items with bulk conversion records and allow additional of additional records.
Figure 27: Existing items with bulk conversion
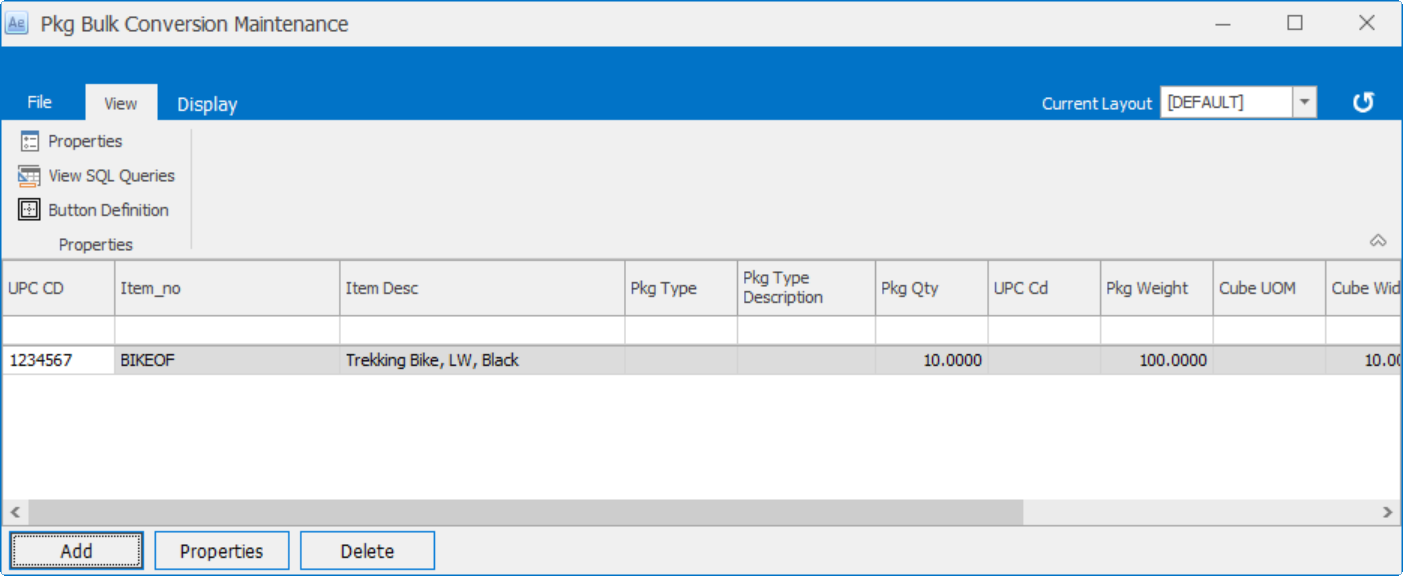
Select the Add button to create a new Bulk Conversions record. This will open the Add record input box. You will need to enter the UPC code for bulk package of the quantity for that case pack.
Figure 28: Creating new bulk conversion records
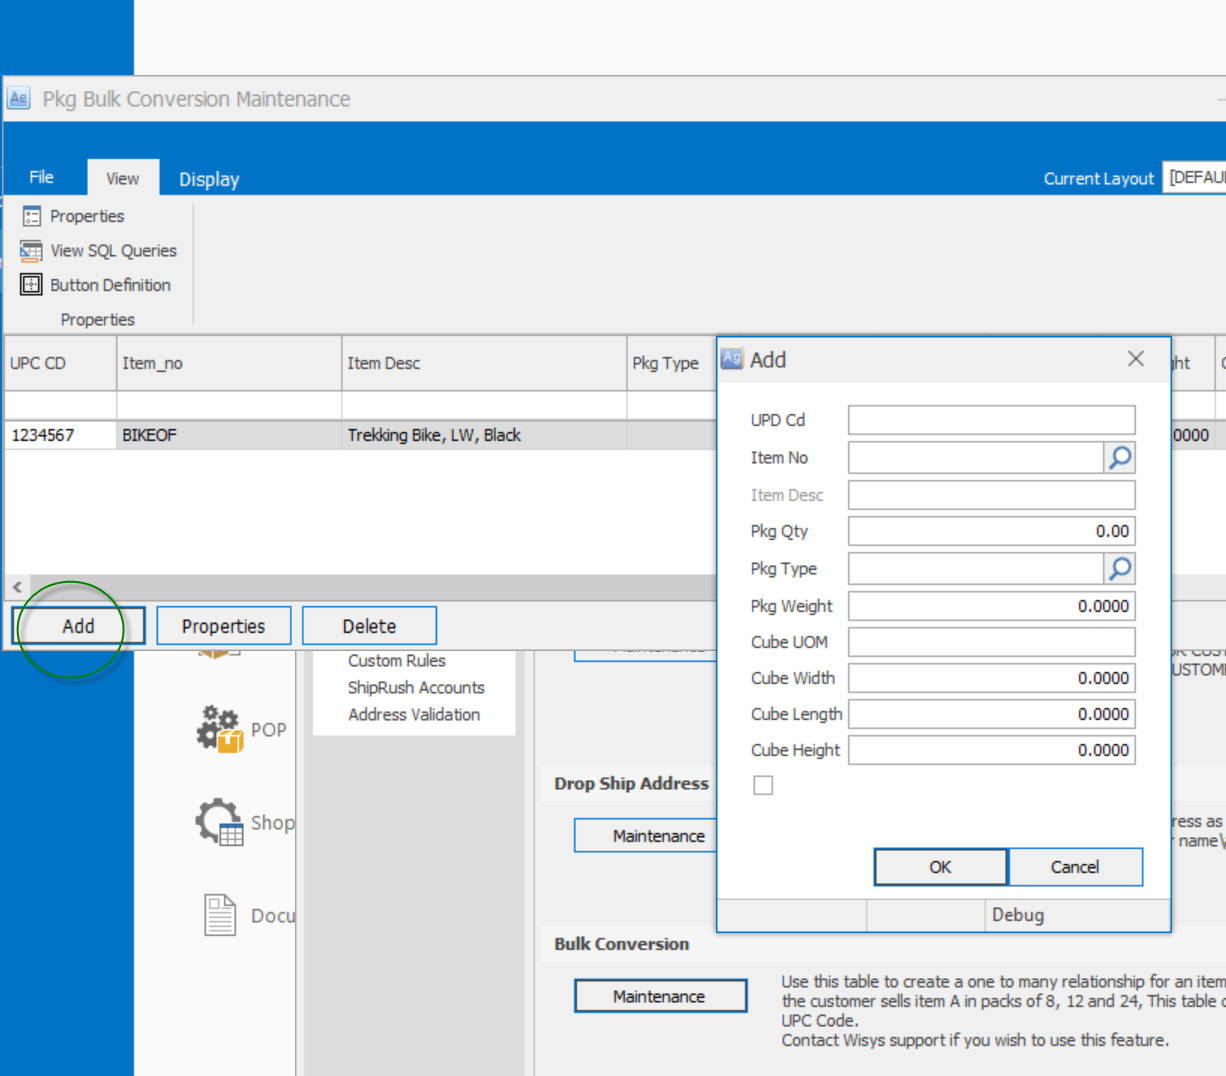
Input the item, package type, quantity per case, case weight and dimensions.
Click OK to save.
When a bulk UPC is scanned in Pick Pack Shipping Tree using the Standard Pack, the bulk package quantity will populate and the bulk weight and dimensions will be used for the package dimensions.
Scale Selection
WiSys supports many scale models connected via a serial port. However, we support only two scale models when connected via a USB port. They are the Mettler Toledo PS 60 and the Fairbanks Ultegra USB scales.
To properly set up the scales, they must first be connected to the workstation and then configured inside the ShipRush application.
To configure for FedEx, open ShipRush for FedEx. Right click on the system tray and select Settings - Shipping Settings. The ShipRush Shipping Settings screen will open.
Select Scales from the menu on the left and then follow the steps in Figure 24 below to enable the scale.
Figure 29: FedEx Scale Configuration
To configure for UPS, open ShipRush for UPS and right click in the system tray and select Settings - Shipping Settings. The ShipRush Shipping Settings screen will open. Select Scales from the menu on the left and then follow the steps in Figure 25 below to enable the scale.
Figure 30: UPS Scale Configuration

Once the scale has been connected to the workstation, configured and tested with positive results within ShipRush, the WiSys workstation can also be configured. To do this open Agility on the workstation and select File - Options - Pick Pack - Scale Selection. Note: You must have Admin rights in Agility to get to this selection.
Figure 31: Agility Scale Settings
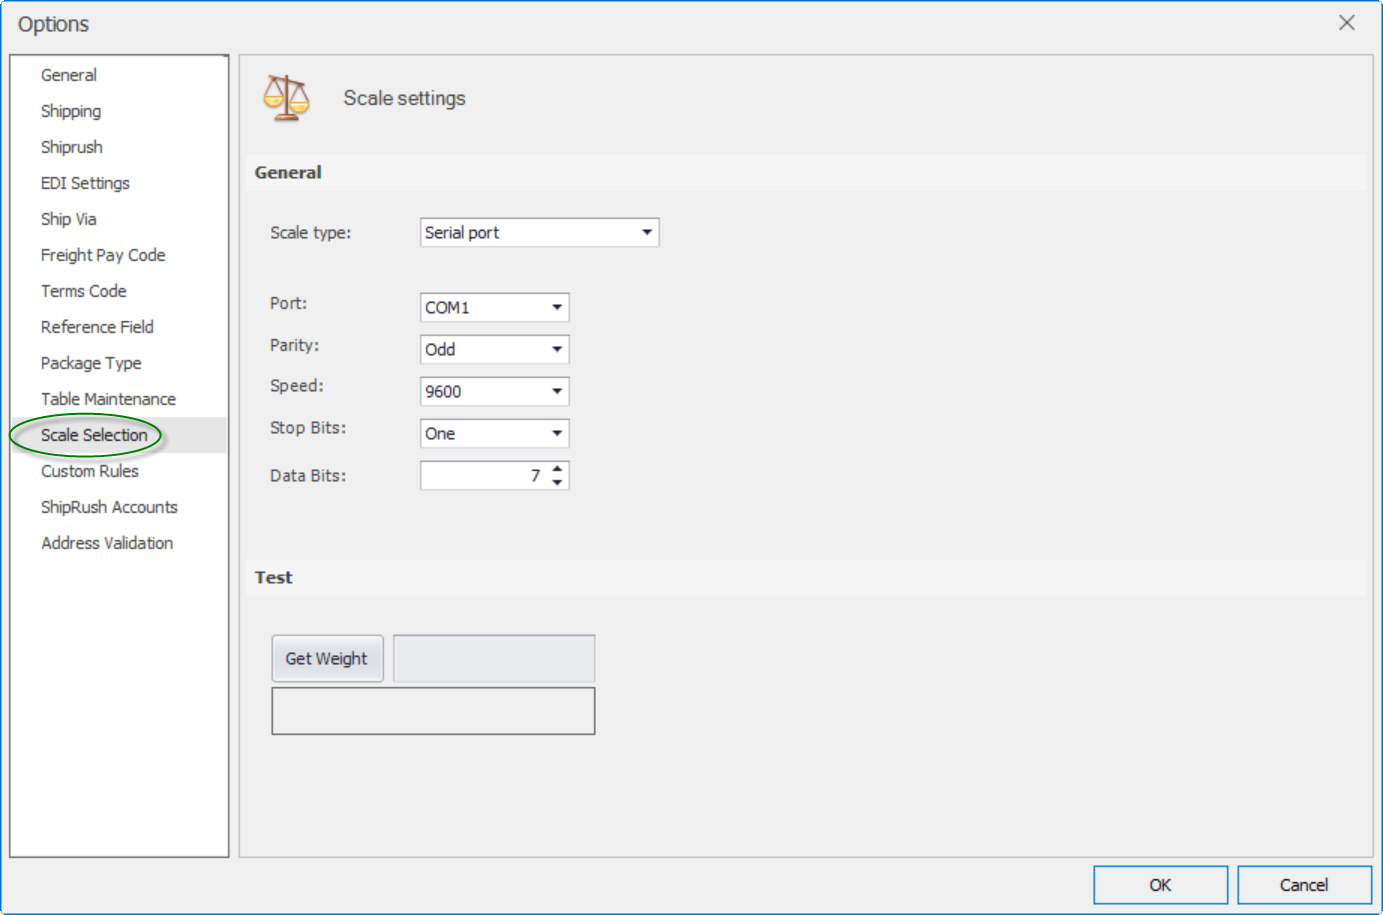
Once the proper scale has been selected for the workstation, put a package on the scale and use the Get Weight button to test that the scale is functioning properly.
Custom Rules
The Custom Rules feature allows you to set custom packing and shipping rules by customer. Select Custom Rules and click “New” to create a new rule. Select a customer in the box labeled “Customer”.
Figure 32: Custom Packing and Shipping Rules
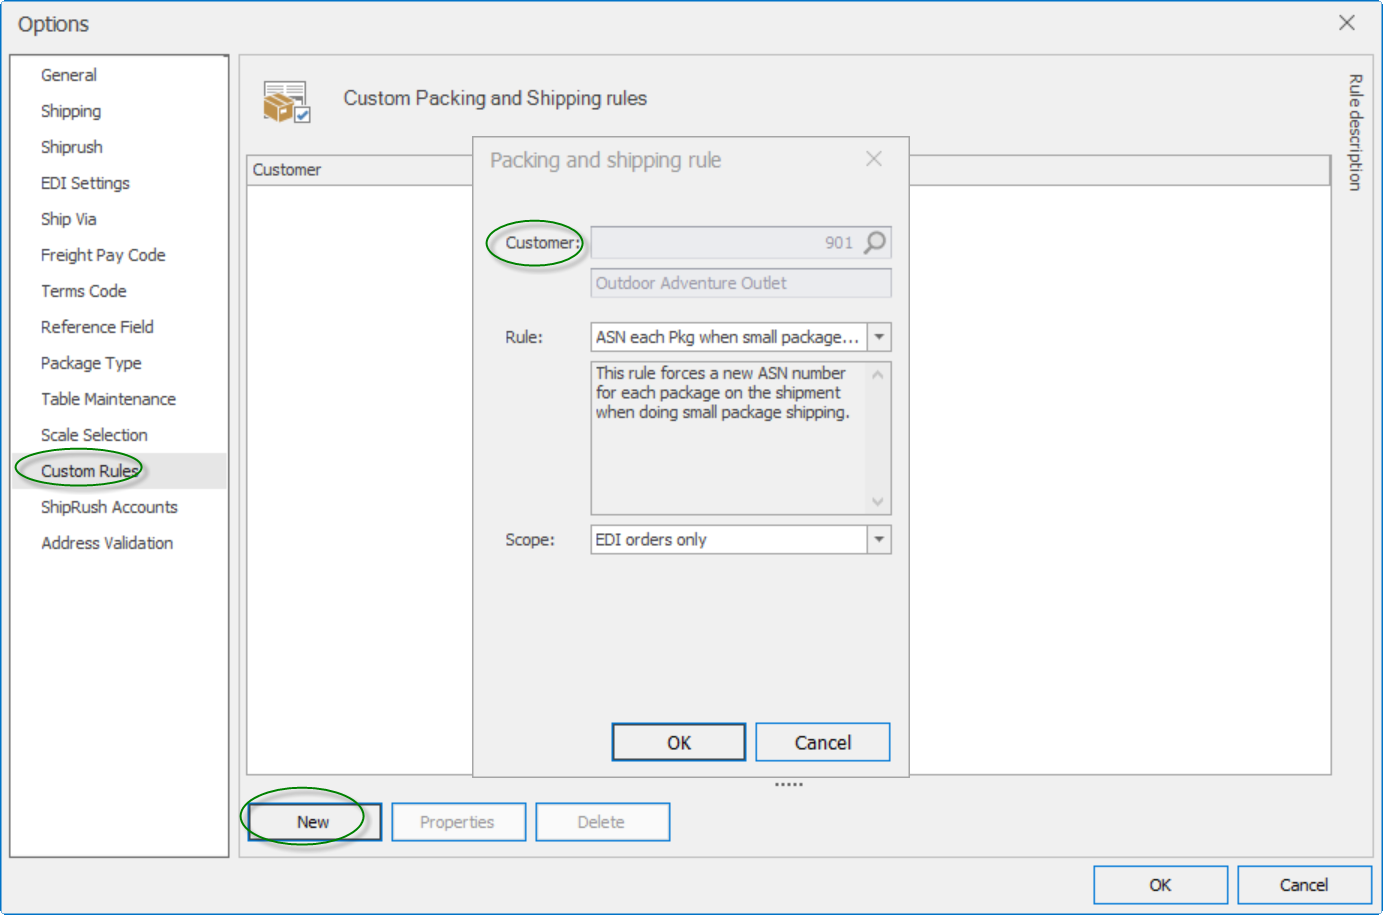
Next select the rule you would like to apply to that customer from the “Rule” drop down box. After you have selected all the custom rules, click “OK” to exit the set up.
· ASN each Pkg when small package shipping: This rule forces a new ASN number for each package on the shipment when doing small package shipping. This rule is for EDI orders only.
· ASN for each Purchase Order: This rule forces a new ASN number for each unique Purchase Order on the shipment. All orders on the shipment need to be for the same customer. All customer orders on a package must have the same purchase order number. This rule is for EDI orders only.
· Do not send email notification: This rule allows you to turn off the automatic sending of an email notification to the customer when the order is shipped. This scope of this role can be set for EDI and Non-EDI orders.
· Unique suffix for each BOL: This rule can only be used along with the “ASN for each Purchase Order” rule. Selecting this rule will cause the BOL on each ASN to have an appended suffix making each BOL unique. This rule is for EDI orders only.
Figure 33: Completed Custom Rules
ShipRush Accounts
Figure 34: ShipRush Accounts
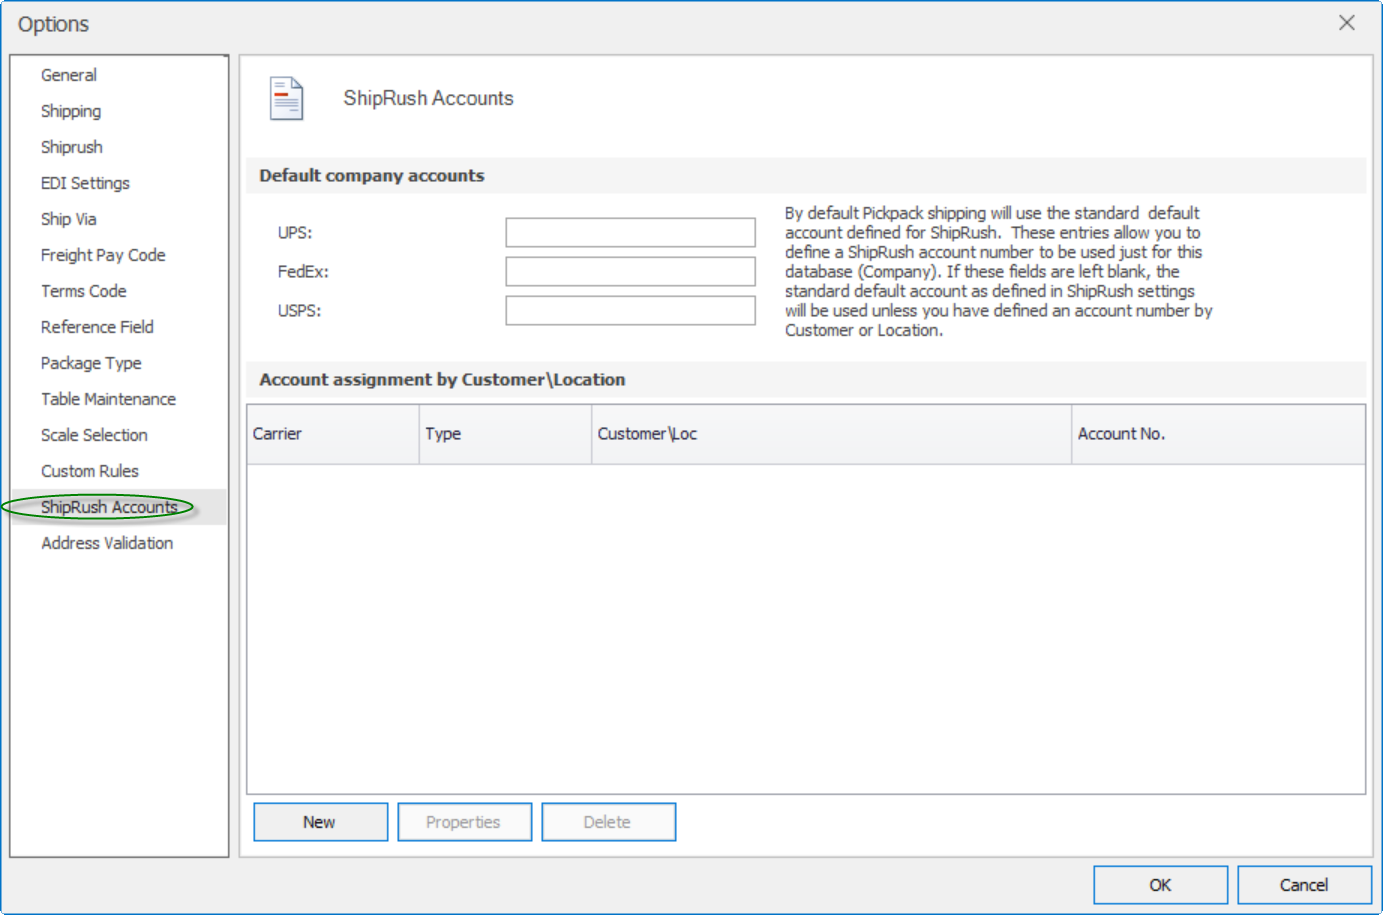
ShipRush Accounts
ShipRush will use the account that is defined as the ShipRush default account to process and charge shipments. This screen gives you the option to specify ShipRush accounts to process shipments setup for a specific company or a specific account to be used by a customer or Macola location. When setup, this will then automatically switch ShipRush to utilize the account setup here versus what is setup as the default ShipRush account, thereby saving the shipping person from having to manually change the account. During shipping in Pick Pack for small packages, the account used and how that account was determined is shown at the top of the shipping screen.
Default company accounts: By default Pick Pack shipping will use the standard default account defined for ShipRush. These entries allow you to define a ShipRush Account number to be used just for the database (Company). If these fields are left blank, the standard default account as defined in the ShipRush settings will be used unless you have define an accounting by customer or Location
Account assignment by Customer\Location: This is used if you need to specify a UPS/FedEx/USPS account for your company that only applies to a specific customer or a specific inventory location.
Figure 35: Account setup
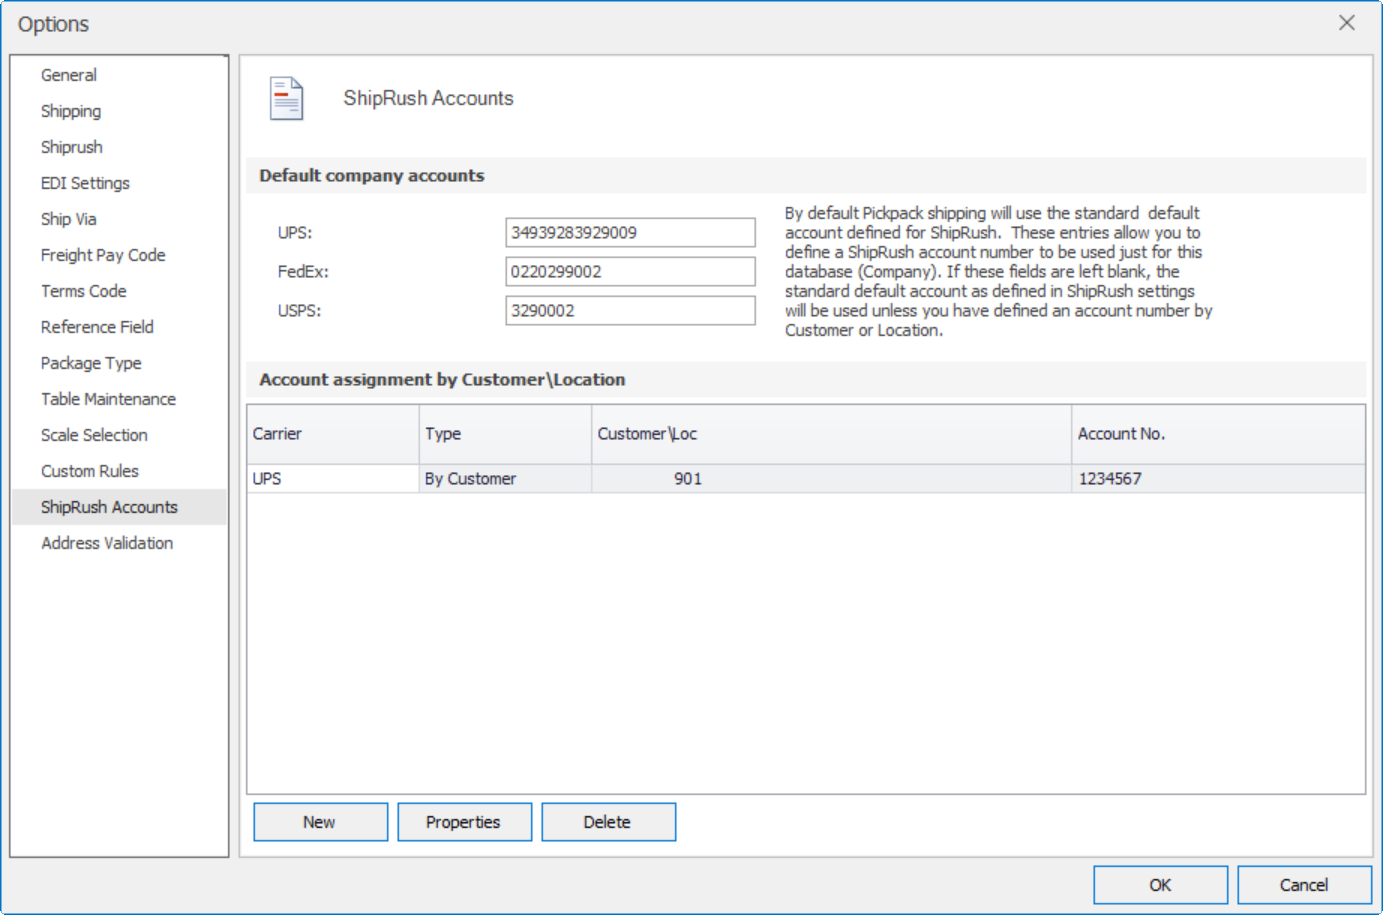
To setup, click New, select by customer or location. Enter or lookup the appropriate Customer or Location. Select the Carrier and enter the Account number to be used for that Customer/Location carrier needed.
Click OK to save.
Address Validation
Figure 36: Address Validation
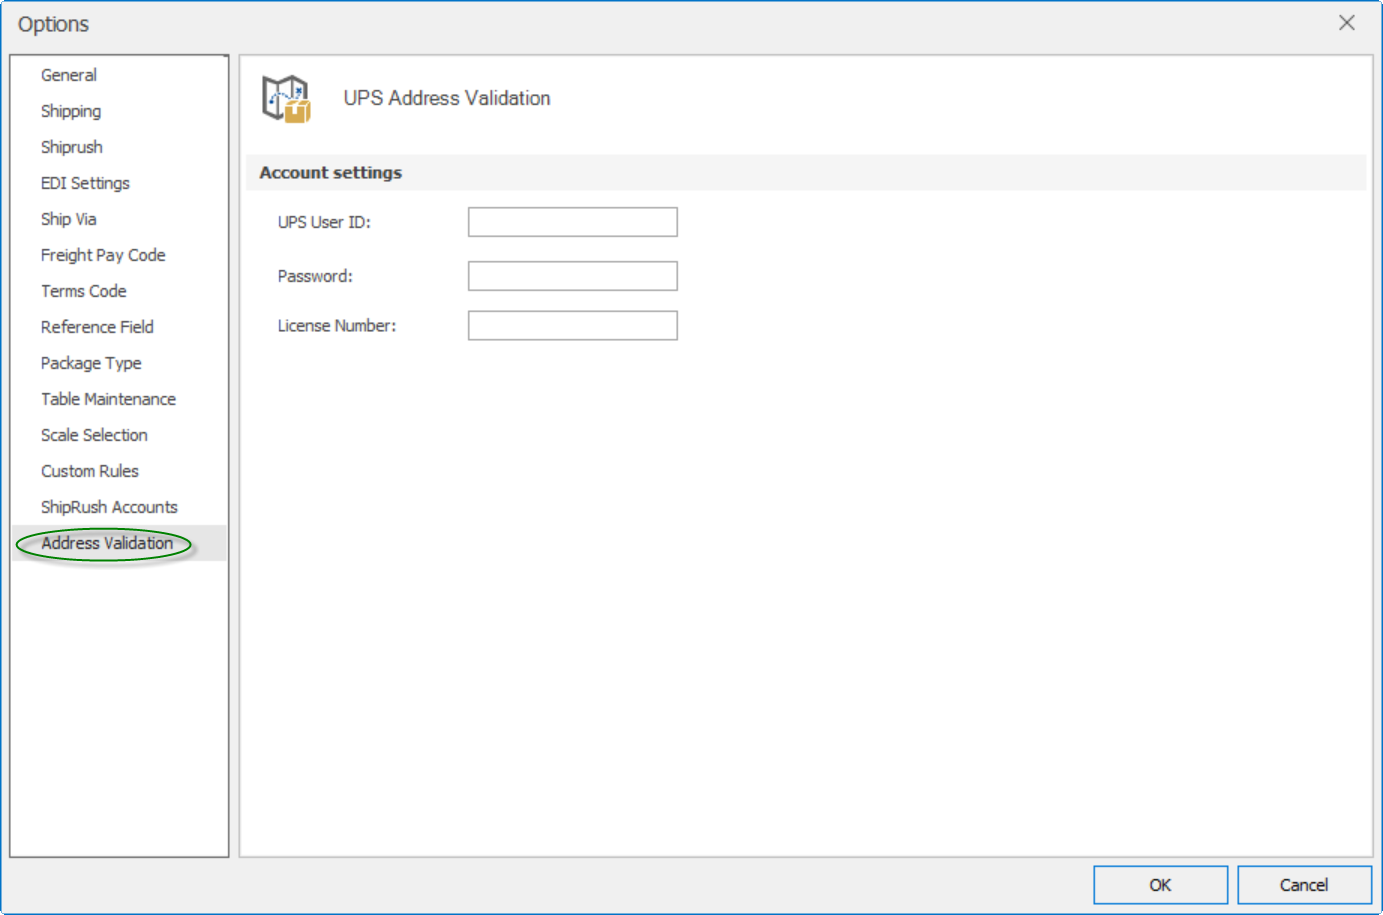
The Address validation uses the UPS API to validate a City State and Zip-code combination. To use this functionality in WiSys, you must first apply for an access key (license number in the setup below) from UPS at https://www.ups.com/upsdeveloperkit?loc=en_US
Once the access key has been assigned, enter the user name, password and access key in the setup in Figure 36.
After the setup is complete, the Address Validation object can be used to validate, or invalidate any City, State and zip combination with a “yes/no” validation.