Agility Options-Shop Floor
AGILITY OPTIONS-SHOP FLOOR
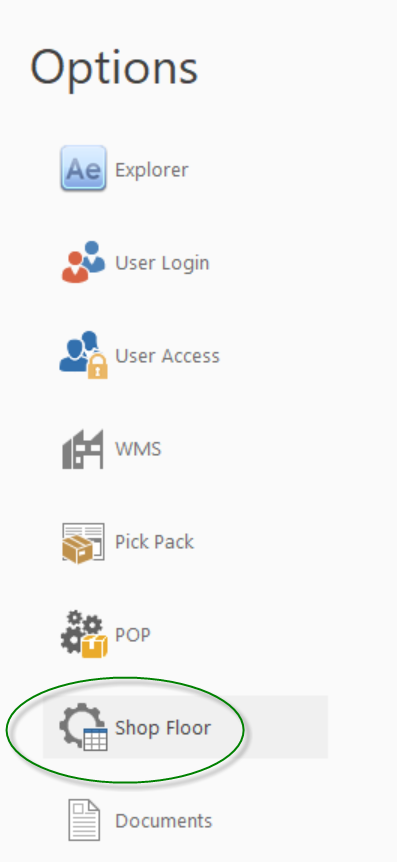
To begin setting up your Ship Floor options in Agility select File then Options then Shop Floor
Figure 1: Locating Shop Floor Options
Appearance
Figure 2: Shop Floor Options- Appearance
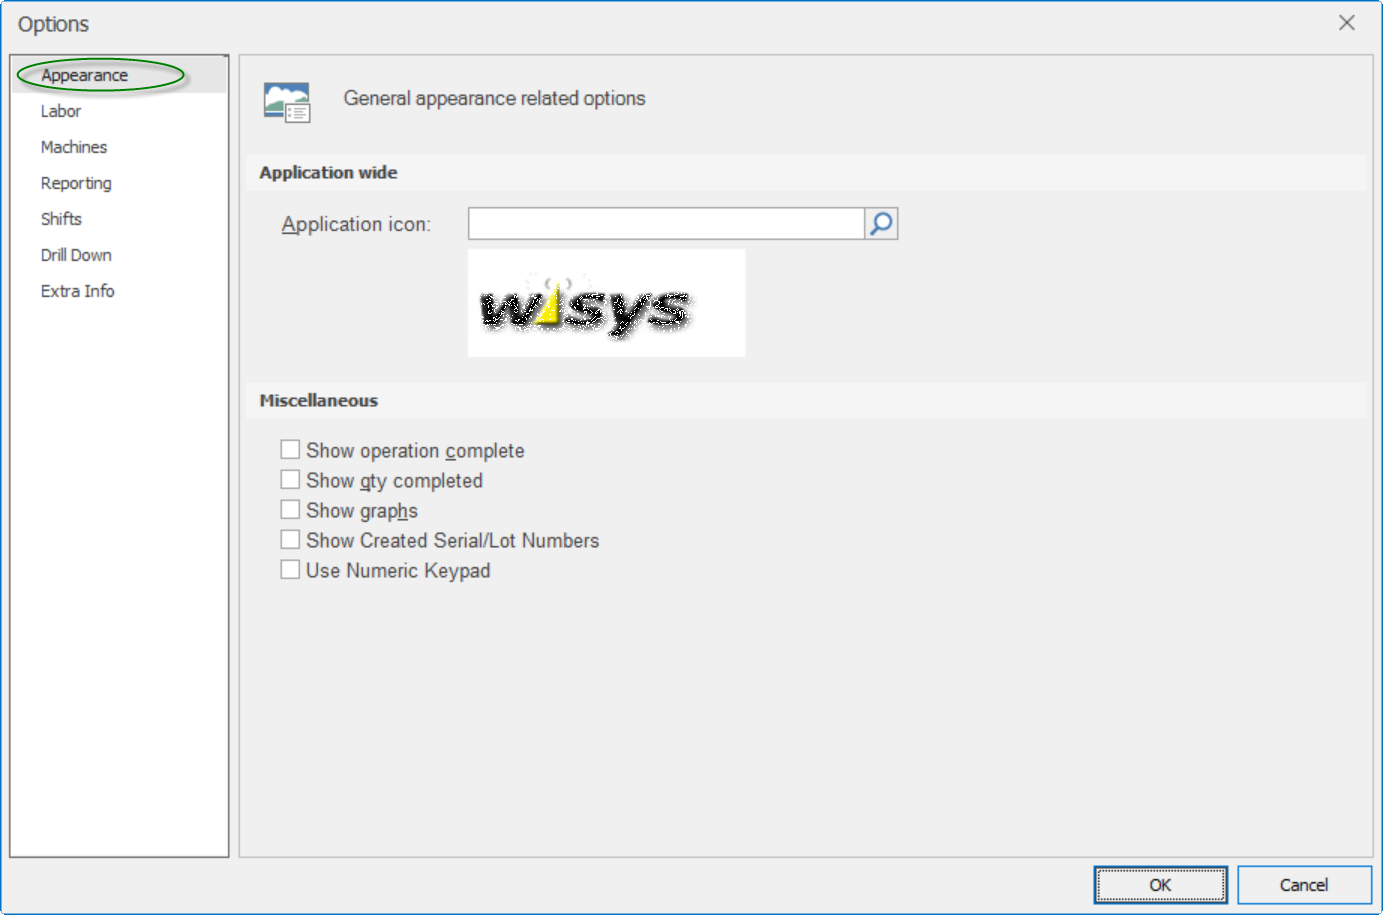
Application icon: Use the magnifying glass to browse to select a company logo or image. That image will be displayed in the upper left corner of the SFWCR screens. The image can be .gif or .bmp format and sized to 185 X 64 pixels.
Miscellaneous
Show operation completed: This option will auto-flag the ”Operation complete” button as operation complete when in the Shop Floor Work Center production reporting screen. This is not recommended since closing shop orders is not a typical function of a shop floor employee.
Show quantity completed: When selected this option shows the field where you enter production quantity, as well as the section where the cumulative completed quantity is displayed in Shop Floor Production reporting.
Show graphs: When selected this option will show a graphical display of labor hours and quantity planned and actual in the Shop Floor production reporting screen.
Show created Serial/Lot numbers: If you have created a SFC Serial/Lot number builder in Serial Lot Setup, Shop Floor Production Reporting will create the Serial/Lot number automatically when production is reported. When selected, this option will show the serial/lot screen which displays that serial/lot number.
Use numeric keypad: This flag enables a pop-up numeric keypad to become available when tabbing into a numeric filed in Shop Floor production reporting, primarily to assist the user in keying in digits using a touch-screen monitor.
Labor
Figure 3: Shop Floor Options-Labor
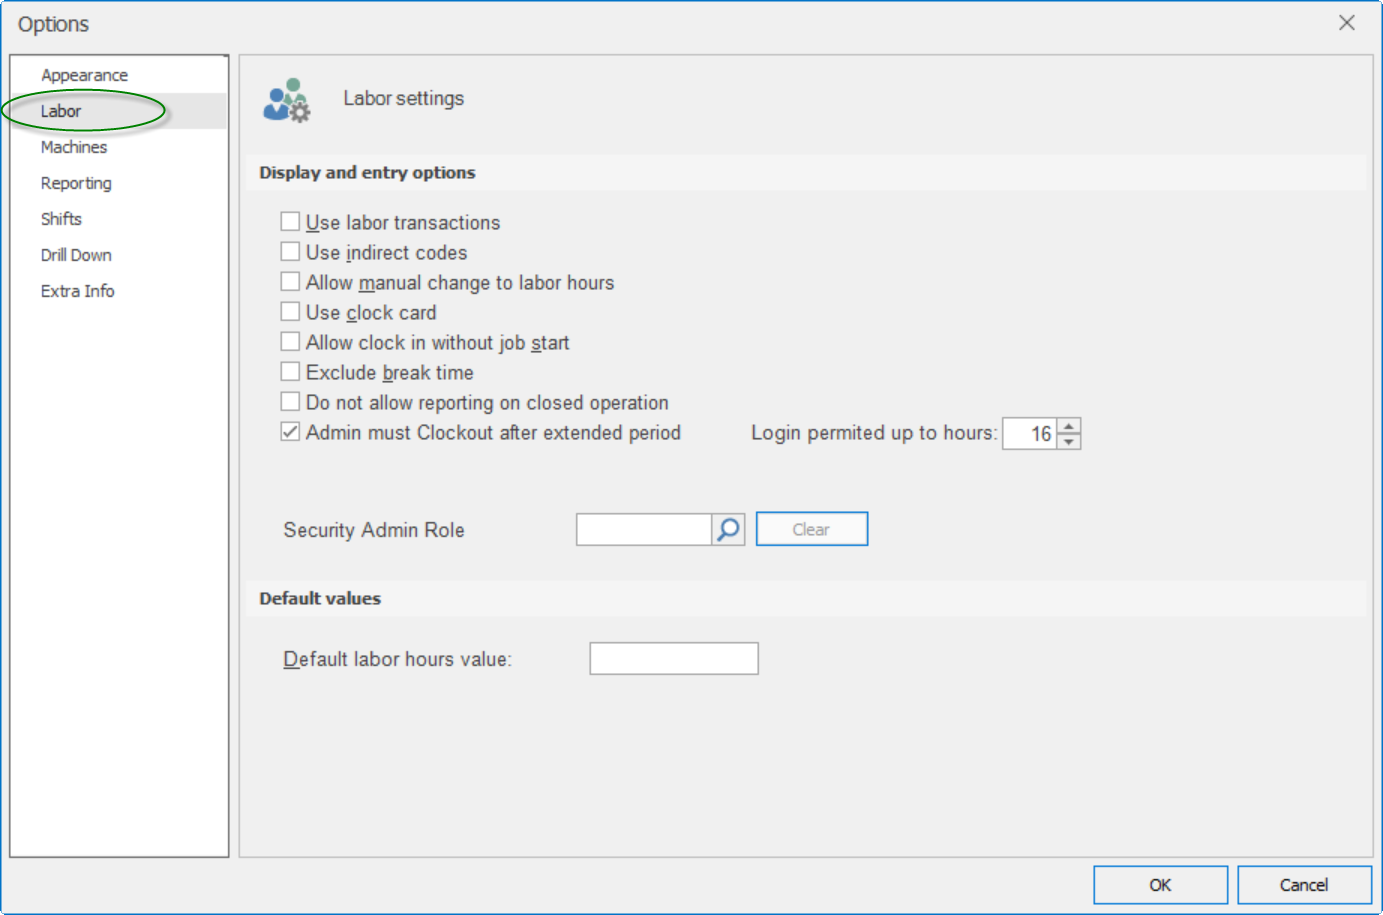
Display and Entry Options
Use Labor Transactions: This option must be used if you are using Macola Labor Performance. When this flag is on, the Ship Floor reported production populates the Macola Labor Performance transaction File (LPTRXFIL_SQL), in addition to the Shop Floor transaction file (MCTRXFIL_SQL). This option is needed in order to be able to generate earnings.
Use Indirect codes: This option works in conjunction with "Use Labor Transactions". This option will show/hide the indirect codes button when an employee logs in to Shop Floor Reporting, which will allow the employee to clock time against an indirect code. When you access the indirect button and select an indirect code, the system will "start" the clock. When you log in the next time, the clock will "stop" and apply the elapsed time to that indirect code.
Allow manual change to labor hours: This option allows the labor hours to be changed when "Use Labor Transactions" is turned off.
Use clock card: This option must be used if you are using Macola Labor Performance. It will force the capture of clock-in and clock-out in order to populate the Labor Performance Clock Card Transaction file (LPCCTRX_SQL).
Allow clock in without job start: This option is only available if "Use clock card" is turned on. When turned on, this option will allow the employee to either clock in or clock in and start a job. If turned off, the employee must start a job (and will be clocked-in automatically).
Exclude break time: If there is a break time defined for the employees shift code in the Macola Shift Code table and this box is selected, the break time will be ignored for any labor transactions recorded.
Do not allow reporting on closed operation: When selected this option prevents reporting on closed operations.
Admin must Clockout after extended period: This option will "lock-out" an employee who attempts to clock out after being clocked in for an extended period of time, as denoted by the number of hours entered in the next setup field. After the extended period, only an administrator can clock-out on behalf of the employee.
Login permitted up to hours: This field permits a positive integer representing the number of hours allowed to be clocked-in before an employee is locked out of the system.
Security Admin Role: Click on the magnifying glass to bring up a list of security roles for the Admin. Role. When selecting this option it will prompt the end user for their name and SSN from the Human Resources file in Macola to be able to log into admin mode.
Default Values
Default labor hours value: By entering a quantity here, the labor hours value entered will always be defaulted when reporting production. If this value is set to -1, the quantity completed defaults to the quantity remaining on the shop order.
Machines
Figure 4: Shop Floor Options-Machines
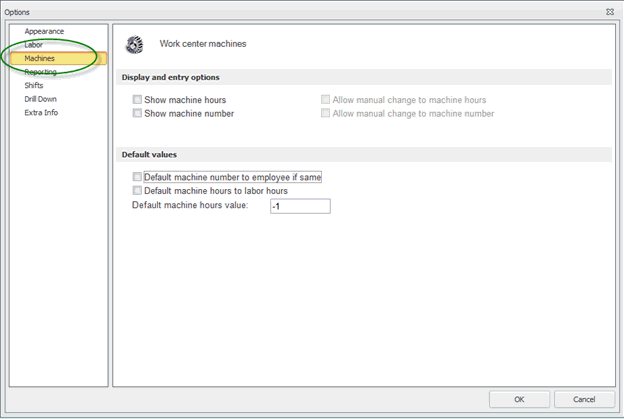
Show machine Hours: This option will show the "Machine hours" field in Shop Floor Work center production reporting screen. Show Machine Number must be enabled to enter machine hours.
Allow manual change to machine hours: This option allows the machine hours to be manually overwritten in Shop Floor production reporting. You must select the "Show machine hours" option to enable this option.
Show machine number: When selected this option will show the "Machine Number" field in Shop Floor Work center production reporting screen. A machine number must be entered when entering machine hours.
Allow manual change to machine number: This option allows the machine number to be changed in Shop Floor production reporting. You must select "Show machine number" option to enable this option.
Default values
Default machine number to employee if same: This option will set the machine number equal to the employee number if they are the same.
Default machine hours to labor hours: This option will default the Machine hours to the labor hours entered during Shop Floor production reporting.
Default machine hours value: Enter a quantity to be used as the machine hours value.
Reporting
Figure 5: Shop Floor Options-Reporting
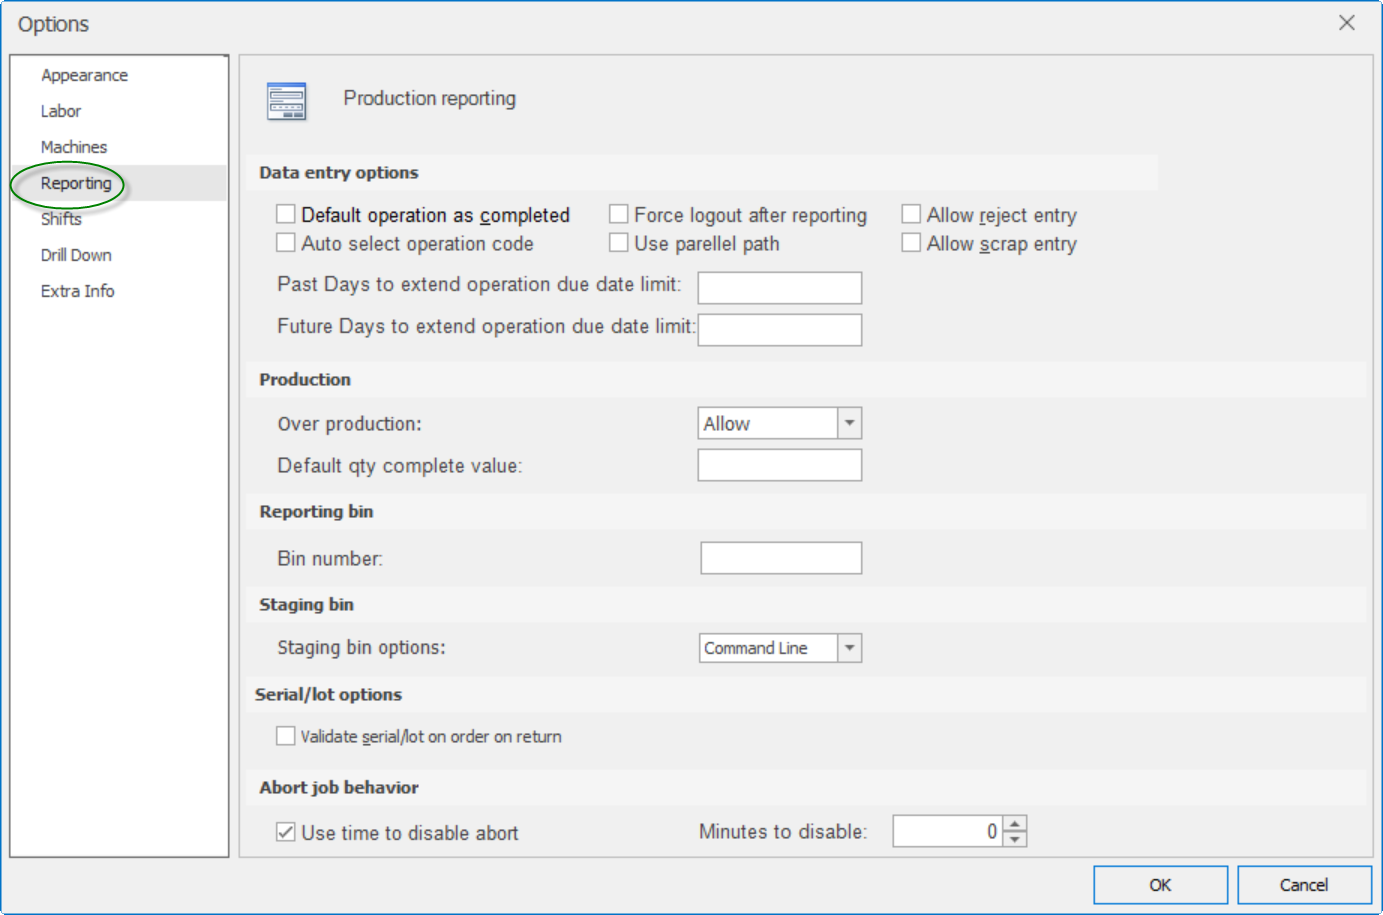
Data entry options
Default operation as completed: This option will auto-flag the "Operation Complete" button as operation complete when in Shop Floor Work center production reporting screen. This is not recommended since closing shop orders is not a typical function of a shop floor employee.
Auto select operation code: When selected, this option will match the labor employee’s home department and work center with an operation of the same department/work center for the entered order and auto-select that operation number for Shop floor production reporting.
Force logout after reporting: When selected, this option will cause the application to log out (and prompt for the next employee number) of the Shop Floor production reporting screen each time a user logs in to report production, in order to allow the next person to do the same.
Use parallel path: If the use of parallel paths is configured in Macola, checking this box will expose the parallel path field and allow the user to select the proper path for an operation when reporting.
Allow reject entry: This option will show the "Reject" quantity button when in Shop Floor Work center production reporting screen. This button will be available on "Y" count operations only, otherwise it will show disabled.
Allow scrap entry: Selecting this option will show a Scrap Button that will allow the employee to report scrap during Shop Floor Production Reporting.
Past Days to extend operation due date limit: When using Shop Floor Production Reporting in Touch Screen mode, the list of shop orders to choose will be limited by the orders whose due date is past the number of days chosen in this field. For example, 7 means only shop orders whose due date was no more than 7 days ago will be listed on the pick screen.
Future Days to extend operation due date limit: When using Shop Floor Production Reporting in Touch Screen mode, the list of shop orders to choose will be limited by the orders whose due date is within the number of days chosen in this field. For example, 7 means only shop orders due up until 7 days from today will be listed on the pick screen.
Production
Over production: Select from Allow, Warn or Prevent. Allow - user can overproduce without any further interruption. Warn - Lets the user know they are about to overproduce but will allow them to do so. Prevent - A hard stop preventing the user from overproducing.
Default qty complete value: This option will set a default value in the quantity complete field in Shop Floor Production Reporting. Any positive number is valid. -1 has a special significance; it represents the shop order planned quantity.
Reporting Bin
Bin number: Enter the bin where all production will be reported to.
Staging bin
Staging bin options: Chose from Command Line or Bin_priority
Serial/lot options
Validate serial/lot on order on return: Checking this box will validate the serial/lot on order on return.
Abort job behavior
Use time to disable abort: This option allows you to control what length of time (in minutes) can transpire before a job can be aborted and no time allocated to that job. Within the disable time, an "Abort Job" button is visible in the Shop Floor Reporting Screen. Once the disable minutes are exceeded, the elapsed time must be applied to the job. The "Abort job" button would not be visible then.
Minutes to disable: Enter how many minutes are allowed for aborting a job.
Shifts
Figure 6: Shop Floor Options-Shifts
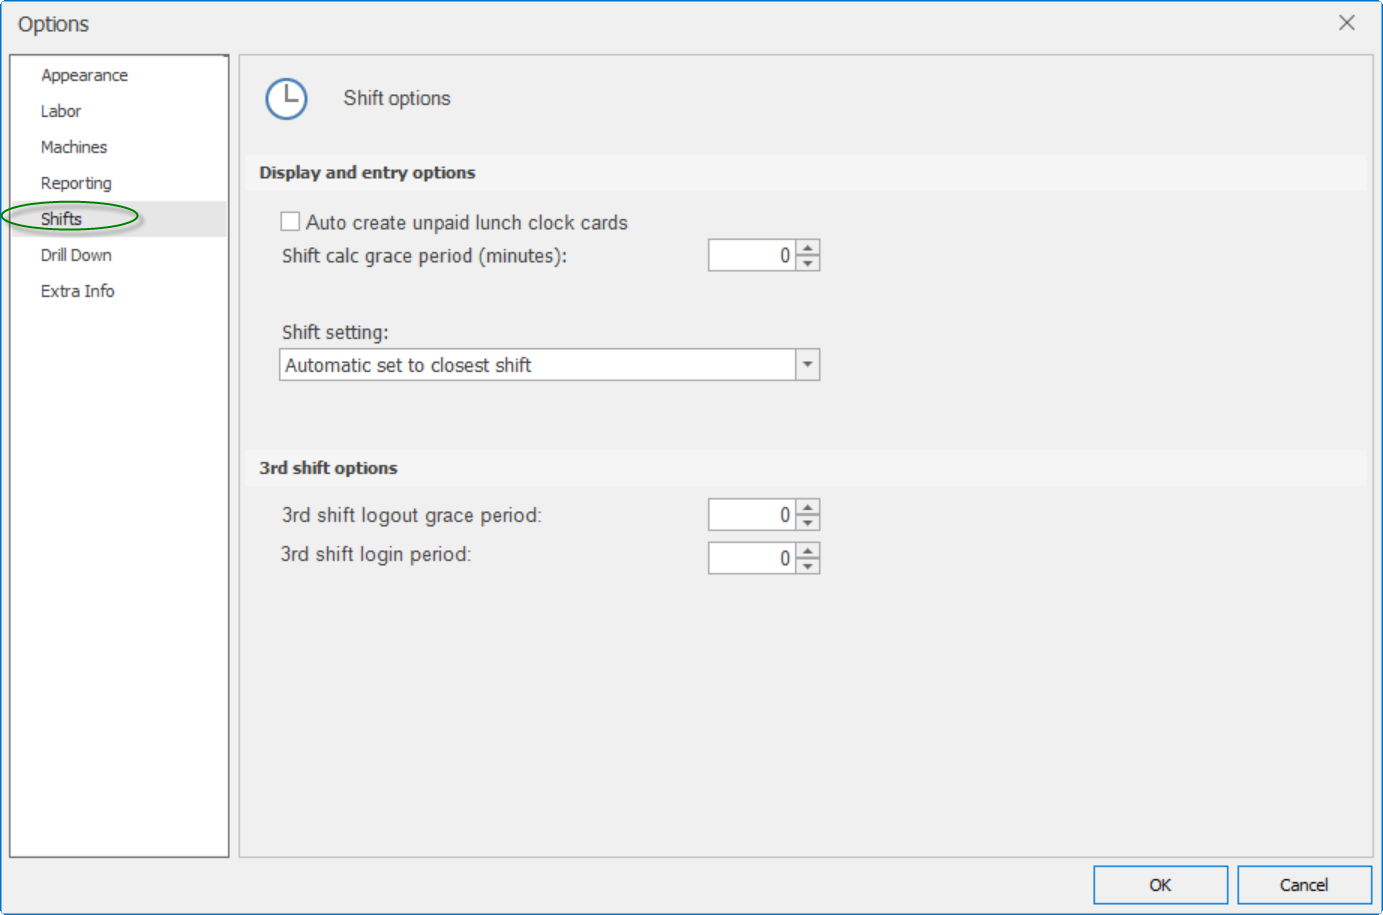
Display and entry options
Auto create unpaid lunch clock cards: When this option is enabled, during clock out, the system will query the Macola Shift Codes table and verify if the employee’s shift code contains unpaid meal time. If so, it checks to see if the employee was clocked out at that time (typically 12:00 to 12:30). If the employee was not clocked-out, then the system automatically enters a clock-out/clock-in entry into the employees’ clock card to account for the unpaid meal break.
Shift calc grace period (minutes): The shift calc grace period is used if the shift setting option is set to "Automatic set to closet shift".
Shift setting: Select from Automatic set to closest shift, Warn on Automatic set to closest shift, Always use default shift or Prevent and require admin to reset employee default shift:
1. Automatic set to closest shift - Employee will be clocked in the closest shift, taking into account the grace period (see shift calc grace period).
2. Warn on automatic set to closest shift - The employee will essentially be prompted to choose the shift to clock-in to.
3. Always use default shift - The employee will always be clocked in to their default shift.
4. Prevent and require Admin to reset employee default shift - This setting will prevent an employee from clocking in to a shift other than the employees default shift.
3rd Shift options
These rules apply when a clock card record exists for yesterday and no clock card record exists for today.
3rd shift logout grace period: If a clock in with no clock out is found within X hours (X = value entered in this field) of yesterday then it will be assumed that the employee is still clocked in and will not start a new clock card.
3rd shift login period: If an employee is clocked out and is attempting to clock in and its within X hours (X = value entered in this field) of his clock out time then use yesterday's clock card.
Drill Down
Used only in button mode of Ship Floor to facilitate easier selection of order.
Figure 7: Shop Floor Options-Drill Down
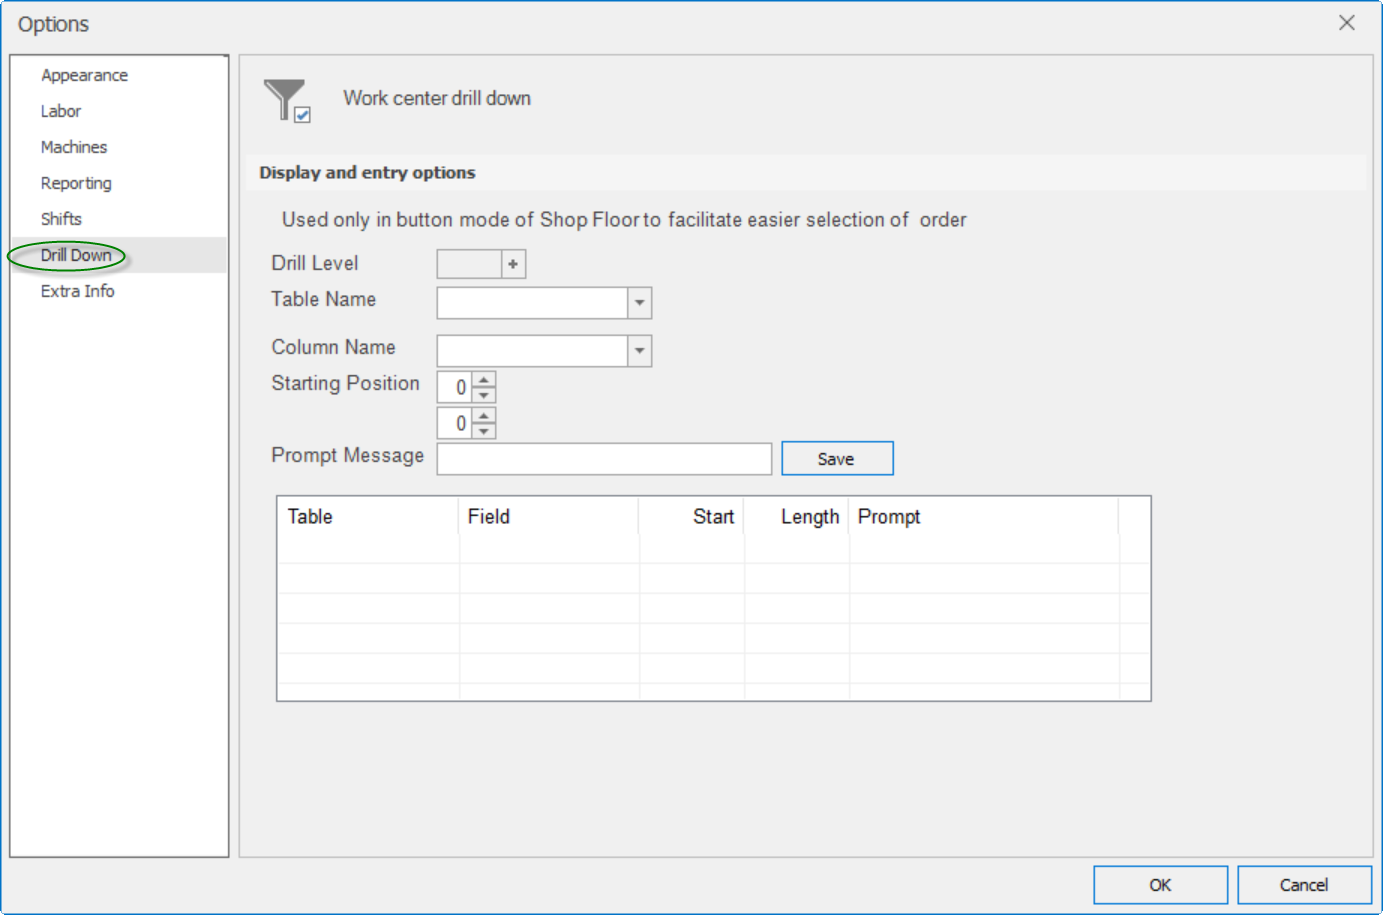
Drill level: This is the level presented to the user first when making a shop order selection. 1 is first selection, 2 is the second selection, and so on. Click the new button at the top to define a new level.
Table name: Select the table that contains the field the user should select from. SFORDFIL is used in the example below.
Column name: This is the field from the table the user will be selecting from. Either Item_No or Job_no from the example below.
Starting position: You can select the starting character position and length of the information to be extracted from the column name selected above.
Prompt message: Enter the name the end user will see on the screen when making a selection.
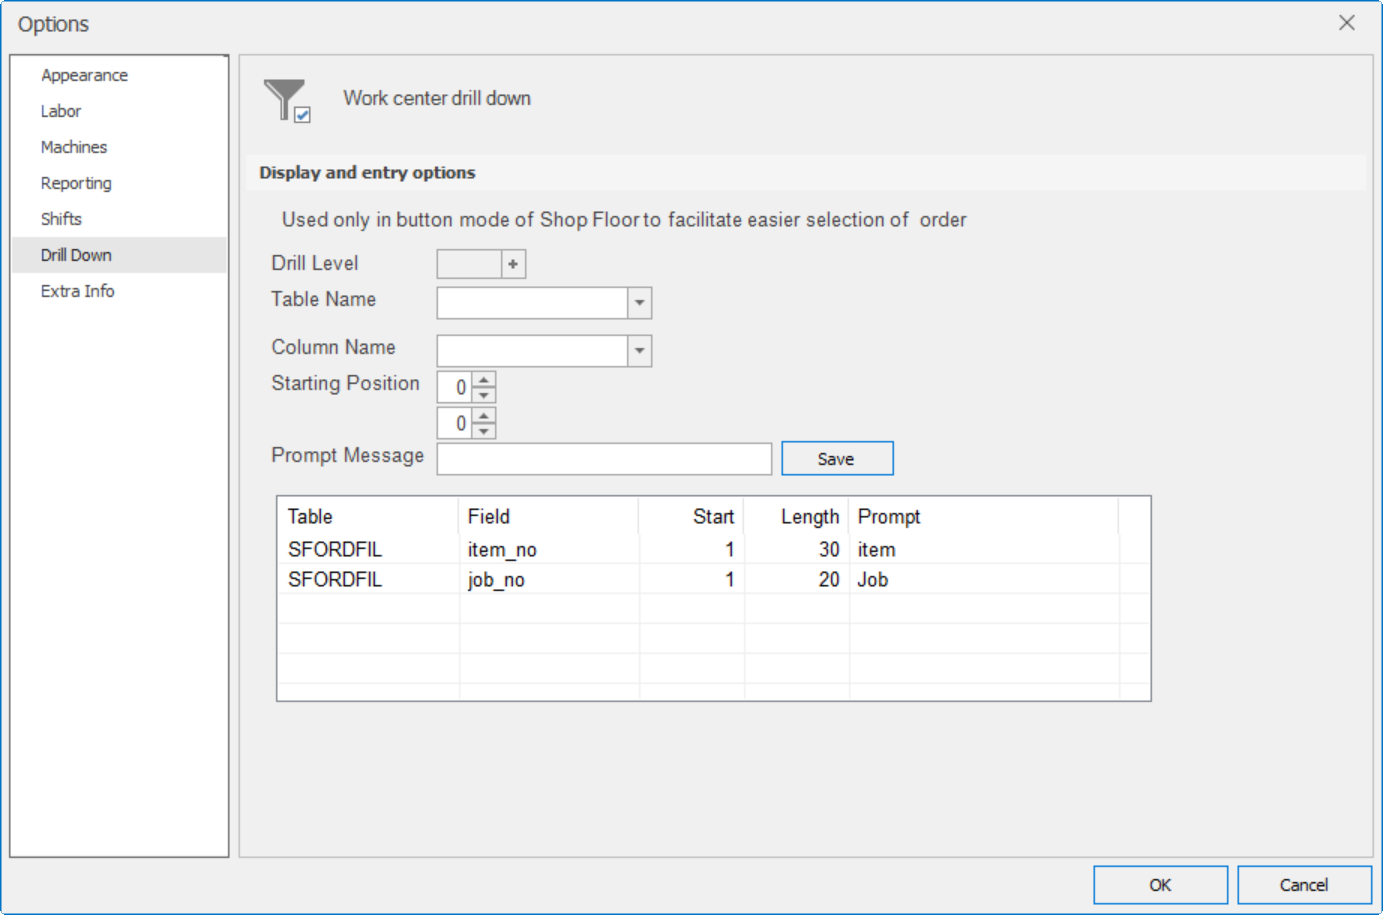
Figure 8: Sample SFC WC Drill Down Configuration
Extra Info
Figure 9: Shop Floor Options-Extra Info
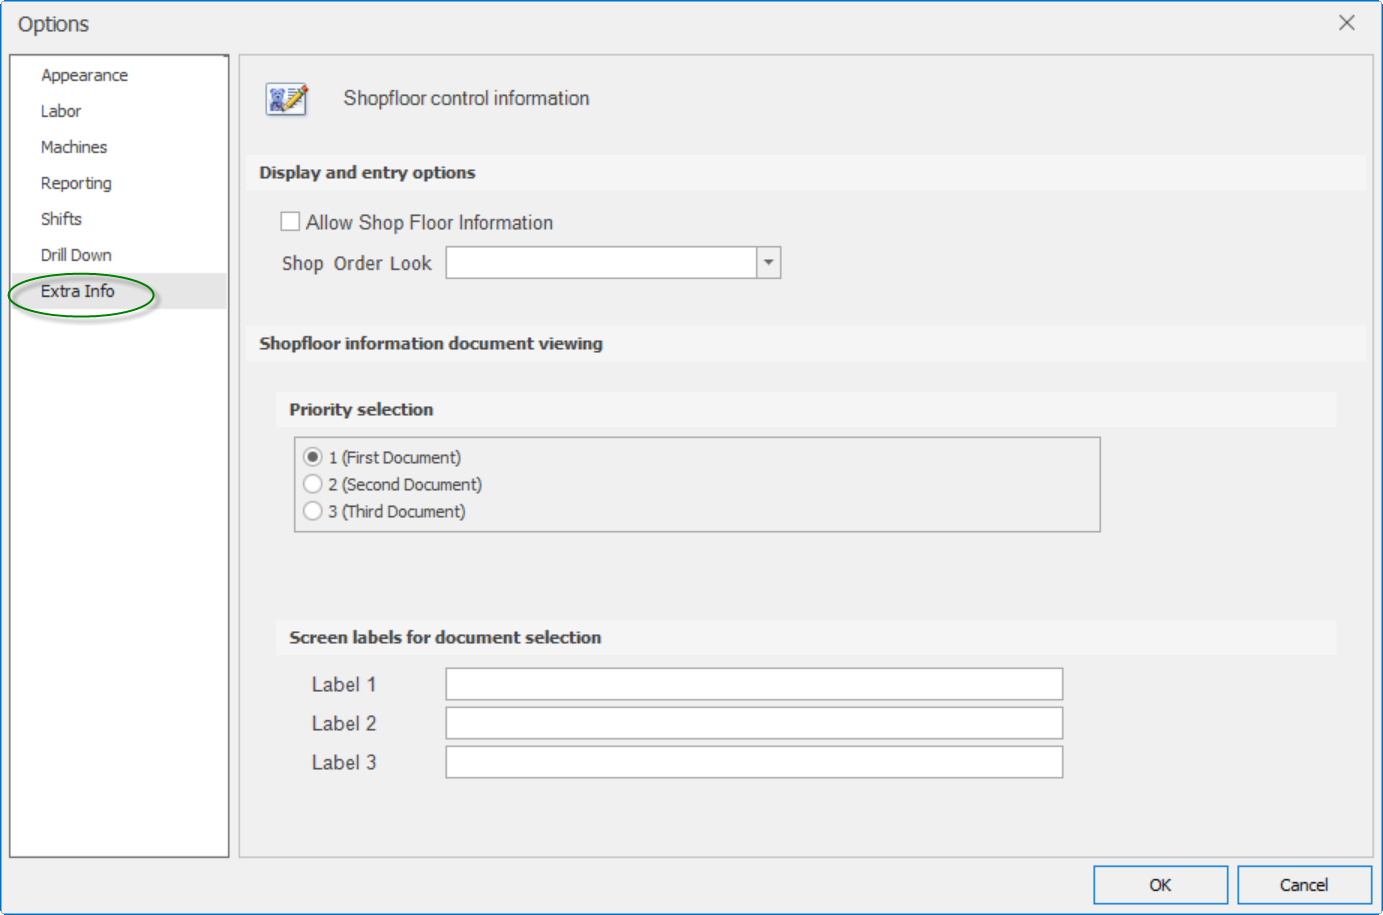
Display and entry options
Allow Shop Floor information: When enabled, this option will display a Shop Order Info icon in the right hand corner of the shop floor reporting screen. Clicking this icon will display shop floor information for all open shop orders.
Shop Order Look: Select from None, Allow Search With Auto Select, or Allow Search Without Auto Select:
None - No lookup available.
Allow Search with Auto Select - This option will show a list of shop orders and operations and when the user selects and order and operation from the list, it will automatically fill this information in on the screen and move on to the next screen.
Allow Search without Auto Select - This option will show a list of shop orders and operations and when the user selects and order and operation from the list, it returns the shop order number and the operation but the user must review and click OK to proceed to the next screen.
Shopfloor information
Priority selection- First, Second, or Third document: Macola allows you to store up to three external documents for view while in Shop Floor reporting. You can view this document when "Allow Shop Floor Information" option is enabled. You can select the priority level of which document is displayed here.
Screen labels for document selection
Label 1, Label 2 Label 3: Enter text for whatever name you would like to use for each of the documents.